Showing posts with label Lovely and Easy. Show all posts

Friday, August 22, 2014

Easy decoration for kids' clothing


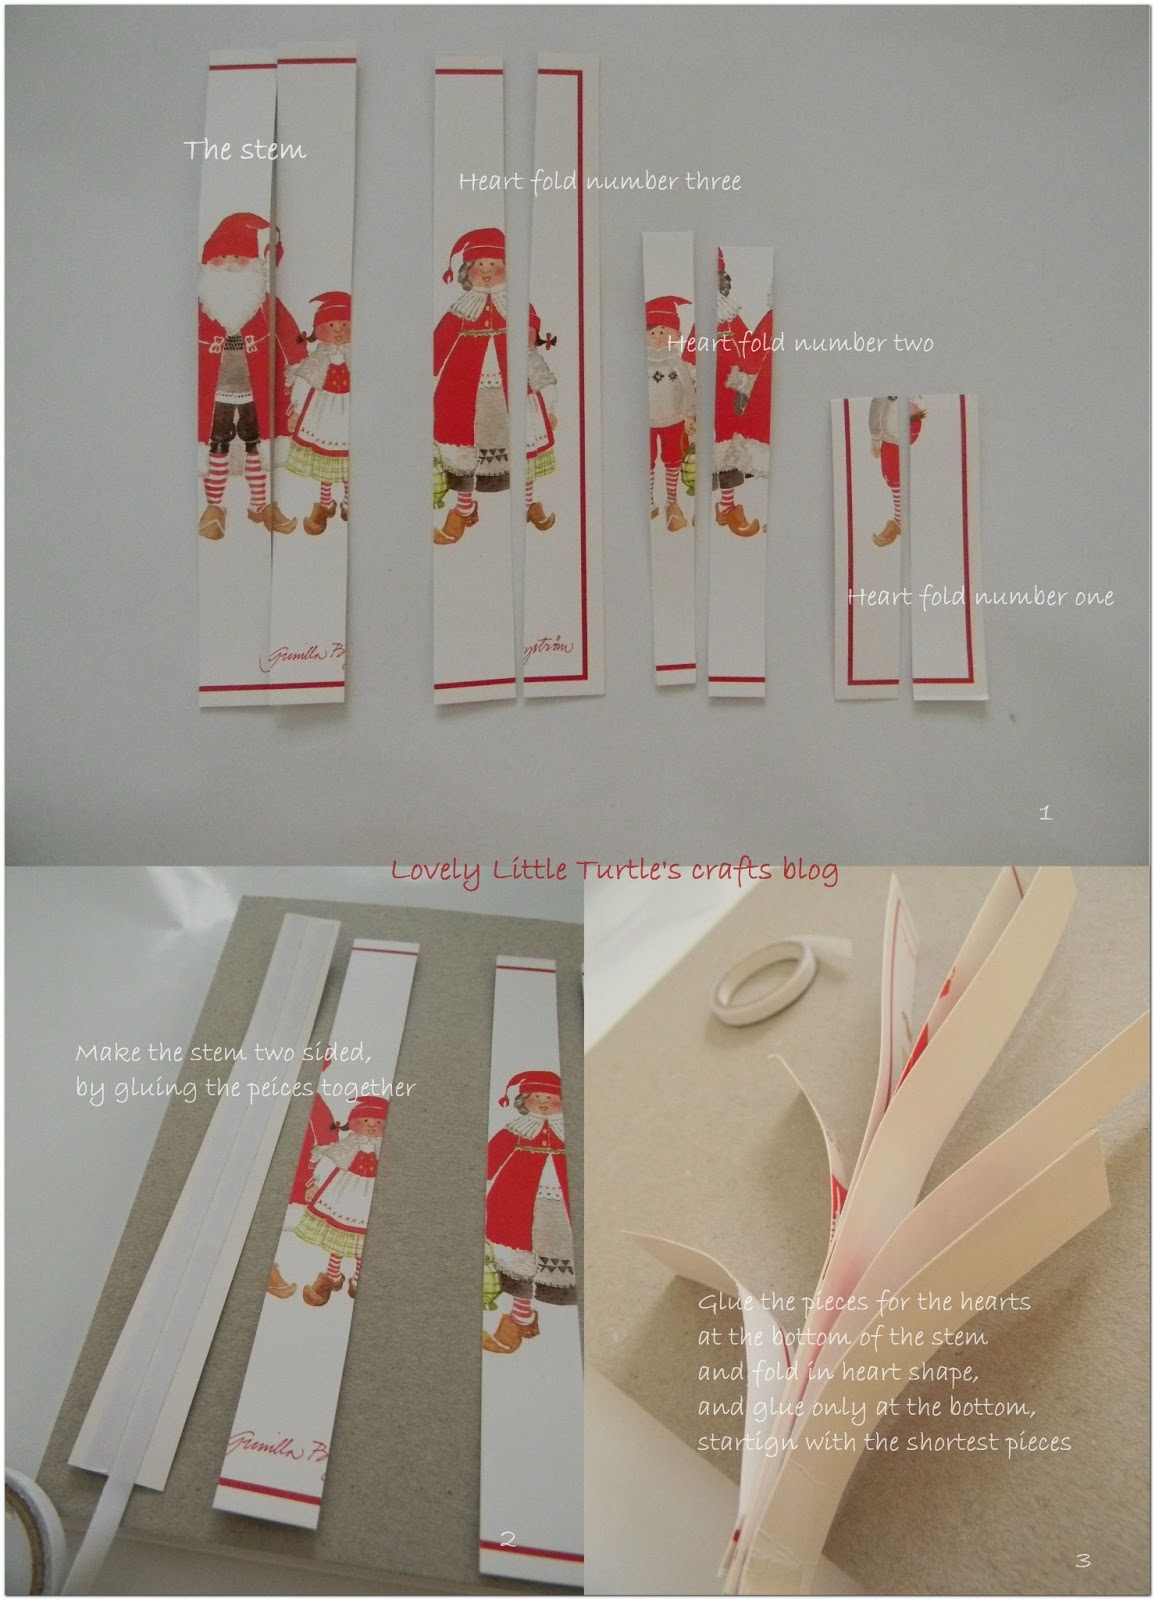
It has been awhile, I have had time to post. And no wonder! Our family grew up in size with another member :) - our second daughter. It actually has been awhile and this month she turned eight months (ah, time flies!), but life with a toddler and a baby has been so hectic, so I haven't had any time to write in here.

Our family's latest member 

Even though the new addition to the family, the busy days and restless lifestyle with two small kids (our older daughter just turned three) I still found, once in while, time to craft. Most projects have been small and always late for the planned deadline, but it did not matter, at the end of the day, they were precious stolen flakes of personal time. 

So here it is, one of the easiest DYI project, of course in the spirit of the events taken place at home.


Two easy decorations for kids' clothing:

'


I. Decoration with buttons 


Easy decoration for kids clothing
Needed materials:

  • T-shirt, that needs reviving :), my older daughter has been avoiding plain T-shirts this summer, and I decided to give them the opportunity to get back in the game
  • Buttons
  • Needle
  • Threads, that match the buttons colors 
  • imagination :) 

Easy decoration for kids clothing with buttons by steps

It is very, very easy to get it right. The only thing you actually need to pay attention to is the place, where you will sew the buttons. I gave a try with my model, my older daughter (she was very happy to help and eagerly put the T-shirt on) and measured the place on the right hand side. Then you simply sew the buttons up. And pretty much, that was it.  And the result was impressive, my kid could not literally take her hands of her "new" T-shirt. 


Tip: I collect all buttons from old pieces of clothing before I throw them away, but you might be able to find some very nice buttons ridiculously inexpensive at the local fabric shops. All shops have a collection of buttons that are left only one or two of a kind and they are giving them away for peanuts.


II. Decoration with adhesive patches for clothing


Easy decoration for kids clothing with adhesive patches

We all have plain T-shirts or shirts that simply beg for extra decoration, especially kids' pieces of clothing. So again an easy project that will make your kids happy with their plain T-shirts. 

Needed materials:
  • fun adhesive patches
  • plain T-shirts
  • iron
  • thread and needles (optional) 

Well, this is rather self-explanatory project :). All you need to do, again is measure the place you will place the patches, iron the patches and enjoy the result.


Tip: For better endurance, usually I add extra layer of iron-on glue. You can buy iron-on glue tape from any shop that sells sewing supplies, or in my case from IKEA. Make sure you use the ironing program without steam when you iron the patch. 


Optionally, you can sew the edges of the patch. This way the patch really stays on.

Good Luck! 


Monday, April 29, 2013

Spring project: Knitted pots from recycled tin cans

It is spring! Although in Finland we might need to wait a bit more to actually feel it. Spring is usually late in Finland, but this year particularly very veeeeery late. So, while waiting for it, I decided to encourage its appearance at least at our home. 


And how? By adding extra green and colors in my kitchen and balcony always helps me feel like spring might be coming soon. So this is what I did - extra green and colors or in other words spring flowers (usually we buy narcissus but this year I got as a gift  very nice dark pink flowers, that make me smile a lot too) and grass. Yes grass! While waiting for spring with its flowering appearance people in Finland sow grass in pots in inside - quite traditional around Easter, mainly to celebrate Spring. I like that tradition, although it took me few years to adopt that habit, but now I am quite frequent. 


This spring, I decided to do something different - to plant my grass in recycled tin cans and knit nice covers for the pots. 


Transforming a tin can into a lovely knitted pot
I am huge fan of recycling (even fanatic I may say) and when I saw this idea on Etsy, I had to do it too. 
To my opinion tin cans are just perfect for almost any crafting, knitting, painting, baking....project. And this looked like an excellent way to practice five needles knitting, so basically my initial reaction was: 'Oh! what am I waiting for?'. 


So I got the tin cans, the yarn - Kelo by Novita - a very popular brand in Finland, number 7 bamboo needles by Hemtex, the patterns and there was I - knitting the tin cans some socks :).  

I would like to come back to the bamboo needles topic, because as a beginner hobby knitter I have heard quite a bit about bamboo needles and decided to try myself. Those that I bought, were cheap, I admit but they worked perfect for me. Smooth service, easy to handle, in general quite nice. As a complete beginner, I can recommend them. I kind of liked the nice 'warm' touch they have compared to metal knitting needles. But that could be just me. :)))) 


Knitted pots for tin cans

For both pots I cast on 28 stitches. One of the patterns was a simple exercise of cable knitting. The other one, I got from a blog called "Watch Knitting" by Fariba Zahed. As a beginner I do watch a lot of instructions and videos about knitting and her blog and Drops Desing's videos are one of the best. Definitely worth looking at them - it's knitting made easy for any one :).  So the pattern I used for the other one of the tin can socks is called: Hexagonal pattern and even though it might look difficult it's rather easy to make. 


Here are the instructions from Fariba's site, with an tiny addition - point 9, by me: 

Row 1)  2 knits, 2 purls,… up to the end

Row 2)  knit and purl as they appear,…up to the end

Row 3)  2 knits, 2 purls,…up to the end

Row 4)  2 knits, 2 purls, * then insert right needle between 6th and 7th stitches in the left needle from front side,while the yarn is behind the work, and turn yarn around the right needle and pull it out .Now knit the pulled yarn with the first stitch in the left needle and continue with one more knit, then 2 purls, 2 knits. here the first line is complete. Then purl 2 more stitches and repeat from *

NOTE: no matter of how many stitches you have and with which stitch you have started , the pulled yarn will cover (2knits+2purls+2knits )

Row 5,6,7 ) knit and purl as they appear,…up to the end

Row 8 ) (2 knits, 2 purls) twice, then repeat from *

Row 9) Start from row 1 again on every ninth row. This way the pulled yarn will advanced in in chess-board order.

You can watch the video in You Tube too.


 Hexagonal pattern on the left, cable knitting on the right 

Knitted pots close-up


Recycle, knit, grow..... 


This is really a great project to bring spring to your home, it takes around two weeks to see the grass coming out, but it definitely worth to wait. Of course, instead of grass you can plant herbs, some blossoming plans, or anything that requires a small pot. And the 'tin can socks' can be various colors or patterns. I happen to like white quite a lot. 

Good Luck! 


Saturday, March 30, 2013

Paper Straw Yarn Crocheted Basket


Crocheted basket from paper straw yarn

Every day I learn something new. This time is was a surprisingly easy and lovely way to crochet baskets. My neighbour had this great tricot yarn crocheted baskets so I just asked her once where she bought them from.  "I made them. It's very easy. I'll show you if you want." was her answer. So one day, here she was at our home with a crochet hook and tricot yarn. Took few repetitions of the beginning, but here was - I crocheting  a basket. 

A week later, while looking for a suitable yarn for another basket, I saw the paper straw yarn and had this image in my head of a hand-made crocheted basket. So, I bought yarn and the result of my efforts was simply lovely.  


Lovely hand-made paper straw yarn crocheted basket


The pattern I used is the only one I can crochet :) so far, and because I am just starting with the abbreviations in crocheting, I did a little search to find one, if some one is interested to make a basket of his/ her own. 

All in all needed materials:

  • Size 3 crochet hook
  • Paper straw yarn
  • 5 hours of your time :) 

Paper straw yarn crocheted basket - bottom in and out 


The patterns can be seen here - but for this basket I advanced the bottom only until round 10 from the instructions and the basket is around 10 cm tall. It took me around 5 hours to make it, as I needed to take some breaks. The paper straw yarn is very hard and it harms your fingers if you keep crocheting longer.

As this was a gift, I made a little crocheted daisy for a decoration (again within my abilities skills). Here you can find instructions from you tube, how you can crochet a daisy yourself. 


Paper yearn crocheted basket and daisy


I tied the daisy to the basket and it made a lovely gift. 


DYI paper straw yarn crocheted basket - an excellent way to store anything that can't find a place for.


Enjoy!


Thursday, March 7, 2013

DYI Muffin liner paper flowers


Muffin liner flowers
I like flowery themes in general quite a lot - vibrant bright colors and wonderful combinations of shapes as well. You can't go wrong with choosing flowers for your crafts projects, they almost always provoke a smile.  

Colors is exactly what I need at the beginning of spring to keep me survive through the last weeks of snow. Yes, I said snow and weeks :) as Finnish spring usually makes an appearance around mid April or early May, so I have few more weeks left for flowers crafting :) to try to sustain my spring anticipation.

So here it is a "give-me-smile" project with paper flowers from muffin or cupcake liners. This project, I made for our friends daughter's sixth birthday, and hearing her "Wow!" was more than enough reward. 

If I need to rate the difficulty level of this project, I would probably say it is intermediate, not because it is challenging to complete, but because it requires some time and patience. But I promise that the result will totally worth it. 


So here it comes the needed materials: 


Needed materials for muffin liners paper flowers


Colorful muffin / cupcakes liners
green paper for the stems and the leaves
grill sticks for the stems 
fast drying glue and/ or glue gun
scissors
pencil for drawing leaves
puncher with flower shape
Optionally:  congratulatory sign, metal tin 

I have prepared three picture tutorials how to create the (1) flowers petals, (2) the stems and (3) the leaves. I hope that they will be explanatory and inspirational enough.  


Step number one: Making the flower petals


The nice thing about the muffin liner flowers is that the petals are made from one whole piece of paper and once the flowers are completed the result is simply gorgeous -no cutting and gluing lines or breaking of the shapes and colors, just smooth natural circles. 

Flower petals from muffin / cupcakes liners

Start the process by cutting the bottoms off the muffin liners, which later on you will be able to use for the middles of the flowers. If you are making more than one flower, like I did you can mix and match the muffin liners' bottoms with the different flower petals. I used the puncher to create the middles of some of the flowers or for others simply the bottoms slightly trimmed.

Make sure that, while gluing the petals with the glue gun, you have placed paper at the middle of flowers at the rare side too, otherwise your flower will get stuck to your work table, and you don't really want that ;)!


Easy to flow steps to make flowers from muffin liners

The rest of the steps are easy to make, just follow the instructions in the images. Using the glue gun was new for me, but I have to be honest that it makes the life of the ordinary crafter much easier. It dries so fast and effortlessly that you will be wondering how you have ever managed without it. 

Before I got addicted to crafts, I had no idea that glues are so diverse and that more than one type will be needed for a single project. Which reminds me a situation at home, when a month a go my husband asked me to loan him "some glue". So I asked "What kind of glue?", he seemed to be puzzled "What do you mean?", he replayed. :)))). Then I had to explain "I have many kinds of glue, for various purposes. Define your need." He did laugh at me and shook his head. :))))) 

And READY! Lovely flowers from cupcake liners

Although the glue gun was rather appropriate for fast and easily transforming the muffin liners into beautiful flower petals, I used all purpose glue for decorating the middles of the flowers, because it is smoother look that leaves no relief. And this is all with the glue types and the flowers ..... for this step.


Step number two: Making the stems 


The making of the stems is quite easy. I used different green colored paper. Cut 0,5 cm wide lines along the length of the paper, glue the grill sticks and roll the paper over the sticks as shown on the picture under. Really easy! One advice, make sure its highness - THE GLUE :) is equally spread along the sticks and do not use cardboard paper, as is fold more difficult.

Once the stems are done and dry, use the sharp end of the grill stick and place it in the middle of the flower. (instruction 6 in the image down). If you have been using the glue gun, you'll find that rather easy to complete, as the glue from the gun forms quite good solid mass. 

Making the stems of the paper flowers

Ones the stems are at their places, the result is simply wonderful! Isn't it? 

Paper flowers with ready placed stems 


And the last step is the making of the leaves and the final touches.


Step number three: Making the leaves 


Making the leaves is the finishing touch of the process and by far the easiest. You can use different colors paper and shapes for them.  

Making the leaves of the flowers 


I particularly like the leaves made with the quilling technique. 


And you are ready!

DIY paper flowers from muffin / cupcakes liners

As I have mentioned above, the flowers were complimentary to a gift to a six years old girl and I decorated a ordinary metal tin can with a congratulatory card to complete the gift. As I have always said, you don't always need branded products to make something wonderful. 


From muffin liners to lovely paper flowers

So, get yourself armed with a little bit of patience, muffin liners and give someone a reason to smile. If you don't have muffin liners/ wrappers are home, but you are supplied with a color printer, I have up-loaded here a  design of muffin liners, that you can print and use to make either flowers or simply cupcake wrappers.


DIY Cupcakes/ Muffin wrappers printable 


Good Luck!


Friday, February 8, 2013

DIY baby pocket bib

What else can make you smile more than a child's excitement when you make something for him/her? Well, it is a rhetorical question for me. Nothing. Of course :). 

Do it yourself pocket bib


This is the purpose of this post; to share with you the excitement of my 1,8 years old daughter when I made 
this bib for her (and one her bunny). 

I like easy and cute craft ideas that everyone can do with as little hassle as possible. 
So, if you own a sewing machine and a little bit of patience, this can be a fun Saturday afternoon project, which will bring you also lots of gratitude (or at least that was the case with me and my baby-girl). 

This summer, I saw the bib pattern from a friend, who saw it from a friend. And I was intrigued by the idea to make one for for my daughter. I like sewing in general,  but unfortunately my Singer 8082 machine was a cheap and not very good purchase choice and I had to wait till have it fixed in order to make the bib. 

But finally, here it is ready and already in use. And I dare to say, my baby never said "No" to wearing this bib, as she saw me sewing it and when it was ready I explained it was made for her. Ah, the smilies! 


Needed Materials: 

waterproof fabric (the one I used is for raincoats- water-repellent from the outside and cotton from the inside) 
color suitable threads
double fold bias tapes
sewing machine

Chose materials for the bib

I chose colorful floral fabric suitable for a girl and few different one-color double fold bias tapes. Oil-cloths are very popular fabrics for making baby bibs, but I found out that oil-cloths are hard to fold (and you do need to fold the bib to carry it with you when your child eats outside), and once folded then it wrinkles permanently. Also food that collects in the pocket of oil-cloth bib if not washed thoroughly right away it may go mouldy. The fabric I used, as it states above is for raincoats. It folds easily and food can be wiped away with a wet paper cloth if you eat outside and once home you can simply hand-wash it (it also endures machine wash). 

Measurements of the bib

The pattern of the bib can be found in JPG at the bottom of this post. I used my friend's bib as a model, but I  made a little improvement to the original. I made the pocket (the crumb guard) wider than the bib base, so it stays open all the time and easily collects food.  

Moms will definitely appreciate this, I am very very sure... :)))) 

Measurement of the pocket (crumb guard) of the bib

And with the left overs from the fabric, I made a bib for my daughter's favorite stuff toy. :))))) 


Bib for the bunny

Good luck! I am sure your child, niece, nephew, cousin, friend's child etc... will love the result :) 


P.S. Please find here the pattern of the bib, and excuse my handwriting and drawing. ;) 


The bib pattern 


Sunday, January 27, 2013

Recycle your old Christmas cards

Collection of six years Christmas cards
It is the end of January and high time already to take away from the shelves all the Christmas cards from last year. 

But what to do it them? 

Hmm....if you are a sentimental pack-rat, like myself :) you can collect those cards, put them in a box and occasionally have a look at them remembering the years back.... 

... or you can throw them away ( I am not even going to comment on the horror that option brings me-  :)))))

... or you can give new life to those cards, which is a nice compromise and a fun project to do. 


So in this post I will offer you three ideas how to give new life to your last year's Christmas cards. 

Or I will show you how to make: 

Reuse your old Christmas cards

1. Paper ball

2. Paper heart 

3. Paper Wreath

These are very easy to complete projects. It took me around half an hour for each one of them with the cutting of the cards, which I am  not a very big fan of. 


Cutting the cards into pieces

As I mentioned before, these are very easy projects and the hardest thing to do for me actually, was selecting the cards I needed to destroy. As I could not make that choice, so I simply used cards I've bought few years back, before I discovered my passion for paper-crafting, but have never sent them to anyone. 

So, simply pick up few cards and cut them into straight lines along the length. I used my paper cutter for that purpose- easier, faster, less headache and always straight lines.  If you don't have one, no worries, a ruler and a pencil will supply you with directions for the necessary result and if you have steady hands, which I don't (so I have a paper cutter :) ), then you are all set. Once cut, then choose theme and color compatible pieces to achieve a nicer effect. 

Generally one card is enough for making the ball and the heart, but the wreath took almost two large ones.
And here they are, the instruction by a project: 


Project number one: Paper Ball 


Paper ball as a Christmas tree decoration

Needed materials: 

12 - 13 pieces of an old Christmas card cut into 10 cm x 1 cm 
Fast drying glue
a ribbon for a hanger
optionally - additional decoration (I used a button)

I will suggest you to use fast drying glue, because you really do not want to hold the peaces together for more than a minute or two. The additional decoration is optional, I just thought that this button looks nice there. I tried to document all the instructions with step by step pictures, so I hope you will find it easy to follow.


Steps to make a paper ball from last year's Christmas cards


Project number two:  Paper Heart

Paper Heart


Needed materials: 

Old Christmas cards cut into: 
  two times 20 cm x 1,5 cm - for the stem
  two times 10 cm x 1,5 cm - heart fold number one (the smallest)
  two times 15 cm c 1,5 cm - heart fold number two (middle)
  two times 20 cm x 1,5 cm - heart fold number three (the biggest)
glue
ribbon 

I tried documenting the steps again, but when putting the instructions together, I notices I have failed to document all steps. 

However, if you follow the steps in the picture, it's very easy to make the hearts. I made the stem of the decoration two sided, so it will be nice to be seen from both sides, but when I was done with the hearts, I thought that it could be nice to have the hearts two sided too. On the other hand, my cards were empty, and when you use really mailed Christmas cards, there will be handwriting or post stamps left overs in the inner side, which is nice too. 

One advice, I would give is not to cut the pieces too short as cards are usually made of thicker paper or card board and small pieces are hard to bent in circular shapes. That is why 10 cm length was the smallest I could use. 

Making a paper hearts Christmas tree decoration 


And here it is....


Project number three: Paper Wreath 


Paper Wreath
Needed materials: 

Two old Christmas cards cut into: 
  18 pieces cut into 10 cm x 1 cm - level one of the wreath
  18 pieces cut into 10 cm 0,5 cm  - level two of the wreath
  12 pieces cut into 2 cm x 0,5 cm - for the center of the wreath
cardboard template cut into wreath shape - or a doughnut shape 
glue
ribbon 

Steps of making a paper wreath from old Christmas cards 

Follow the instructions in the image to achieve the desired result. The third level of the wreath (with the small pieces) is not necessary but it gives a great finishing touch. You can achieve that gluing a ribbon, or buttons or anything else theme suitable as well. 

Well, this is it this time. Rather long, but I hope inspirational for you post. And remember you can use these instructions for any other seasonal or non-seasonal projects you have. I just thought that these three items make wonderful Christmas tree decoration and this way all the nicest wishes your friend put into sending these cards to you will still be there with you every Christmas. 

Good Luck! 

New life for your old Christmas cards


Sunday, January 13, 2013

Easy decoration for a frame


In this post, I would like to show you a very easy way to decorate and personalize a frame.

I like experimenting with new techniques and this is what came up when I decided to combine acrylic paint, a rubber stamp and a frame. This project was a part of the 'Thank you' gift for my yoga teacher, with which I started my blogging experience. If you are curious to read, simply scroll down and you will see it - post Number One

I wanted to have similar elements at the picture frame and the card, that is why I used the same rubber stamp and white acrylic paint.
Similar patterns
Although, the rubber stamp contained detailed instructions with what brand of ink I SHOULD be using it, I did not follow the instructions. I am not a big fan of branding instructions and with experience in marketing, I really really know what's the catch all about. So, I tried my own technique. And it did work! 

But, please do not accept that as an anti-branding propaganda, I just think that sometimes it's nice to try something else or new, though I need to admit, I have ruined projects by not following the instructions. Ops! (an ashamed face emoticon would be an appropriate one right now :) ). 

Well, well, anyway - this project succeeded nicely and was very easy to make. And it is wonderful! It just brings such a nice personal detail to a frame. 

So, needed materials:

Needed materials for decorating a frame

an wooden frame
rubber stamp
white acrylic paint
a brush to lay the paint on

Why acrylic paint?

Well, due to its properties, acrylic paint dries fast and you can achieve a nice relief of the service. Usually acrylic paint does not washes away easily with water, so it is perfect for purposes like this one.

Applying paint on the rubber stamp

Apply the paint over the rubber stamp, making sure that there is not excessive amount of paint on the stamp. Too much paint will smudge the image, too little will make it look pale. I would recommend you to try stamping few times on a separate piece of paper beforehand, so you can get a grip of the amount of paint you need to use.    

Applying pressure


Once you have mastered the technique, just bravely stamp over the frame. Apply pressure and wait for 15-20 secs before you separate the stamp from the frame. Leave the paint to dry as much as it needs - that usually depends on the amount of paint you have applied. If you are in a hurry, you can help the drying process with a hairdryer, but do not use it for cards. And I would really recommend to leave a day until you can use the frame for the necessary purpose. 

And this is it! You are ready! 


The frame ready for adding a painting


Add your picture, painting, photo, fabric, whatever you like.... For my yoga teacher, I also painted this picture of flowers. I used to like painting when I was a child, and decided to reconnect with that hobby of mine. 


Easy and lovely hand decorated picture frame
It's easy and the result is wonderful! 

P.S. I made the explanatory images with another wooden frame, as you probably see, but today when I wanted to up-date the blog, I realized that I haven't taken these pictures, when I decorating the frame. And the frame is already with my yoga teacher.