Showing posts with label Paper Crafts. Show all posts

Thursday, March 7, 2013

DYI Muffin liner paper flowers


Muffin liner flowers
I like flowery themes in general quite a lot - vibrant bright colors and wonderful combinations of shapes as well. You can't go wrong with choosing flowers for your crafts projects, they almost always provoke a smile.  

Colors is exactly what I need at the beginning of spring to keep me survive through the last weeks of snow. Yes, I said snow and weeks :) as Finnish spring usually makes an appearance around mid April or early May, so I have few more weeks left for flowers crafting :) to try to sustain my spring anticipation.

So here it is a "give-me-smile" project with paper flowers from muffin or cupcake liners. This project, I made for our friends daughter's sixth birthday, and hearing her "Wow!" was more than enough reward. 

If I need to rate the difficulty level of this project, I would probably say it is intermediate, not because it is challenging to complete, but because it requires some time and patience. But I promise that the result will totally worth it. 


So here it comes the needed materials: 


Needed materials for muffin liners paper flowers


Colorful muffin / cupcakes liners
green paper for the stems and the leaves
grill sticks for the stems 
fast drying glue and/ or glue gun
scissors
pencil for drawing leaves
puncher with flower shape
Optionally:  congratulatory sign, metal tin 

I have prepared three picture tutorials how to create the (1) flowers petals, (2) the stems and (3) the leaves. I hope that they will be explanatory and inspirational enough.  


Step number one: Making the flower petals


The nice thing about the muffin liner flowers is that the petals are made from one whole piece of paper and once the flowers are completed the result is simply gorgeous -no cutting and gluing lines or breaking of the shapes and colors, just smooth natural circles. 

Flower petals from muffin / cupcakes liners

Start the process by cutting the bottoms off the muffin liners, which later on you will be able to use for the middles of the flowers. If you are making more than one flower, like I did you can mix and match the muffin liners' bottoms with the different flower petals. I used the puncher to create the middles of some of the flowers or for others simply the bottoms slightly trimmed.

Make sure that, while gluing the petals with the glue gun, you have placed paper at the middle of flowers at the rare side too, otherwise your flower will get stuck to your work table, and you don't really want that ;)!


Easy to flow steps to make flowers from muffin liners

The rest of the steps are easy to make, just follow the instructions in the images. Using the glue gun was new for me, but I have to be honest that it makes the life of the ordinary crafter much easier. It dries so fast and effortlessly that you will be wondering how you have ever managed without it. 

Before I got addicted to crafts, I had no idea that glues are so diverse and that more than one type will be needed for a single project. Which reminds me a situation at home, when a month a go my husband asked me to loan him "some glue". So I asked "What kind of glue?", he seemed to be puzzled "What do you mean?", he replayed. :)))). Then I had to explain "I have many kinds of glue, for various purposes. Define your need." He did laugh at me and shook his head. :))))) 

And READY! Lovely flowers from cupcake liners

Although the glue gun was rather appropriate for fast and easily transforming the muffin liners into beautiful flower petals, I used all purpose glue for decorating the middles of the flowers, because it is smoother look that leaves no relief. And this is all with the glue types and the flowers ..... for this step.


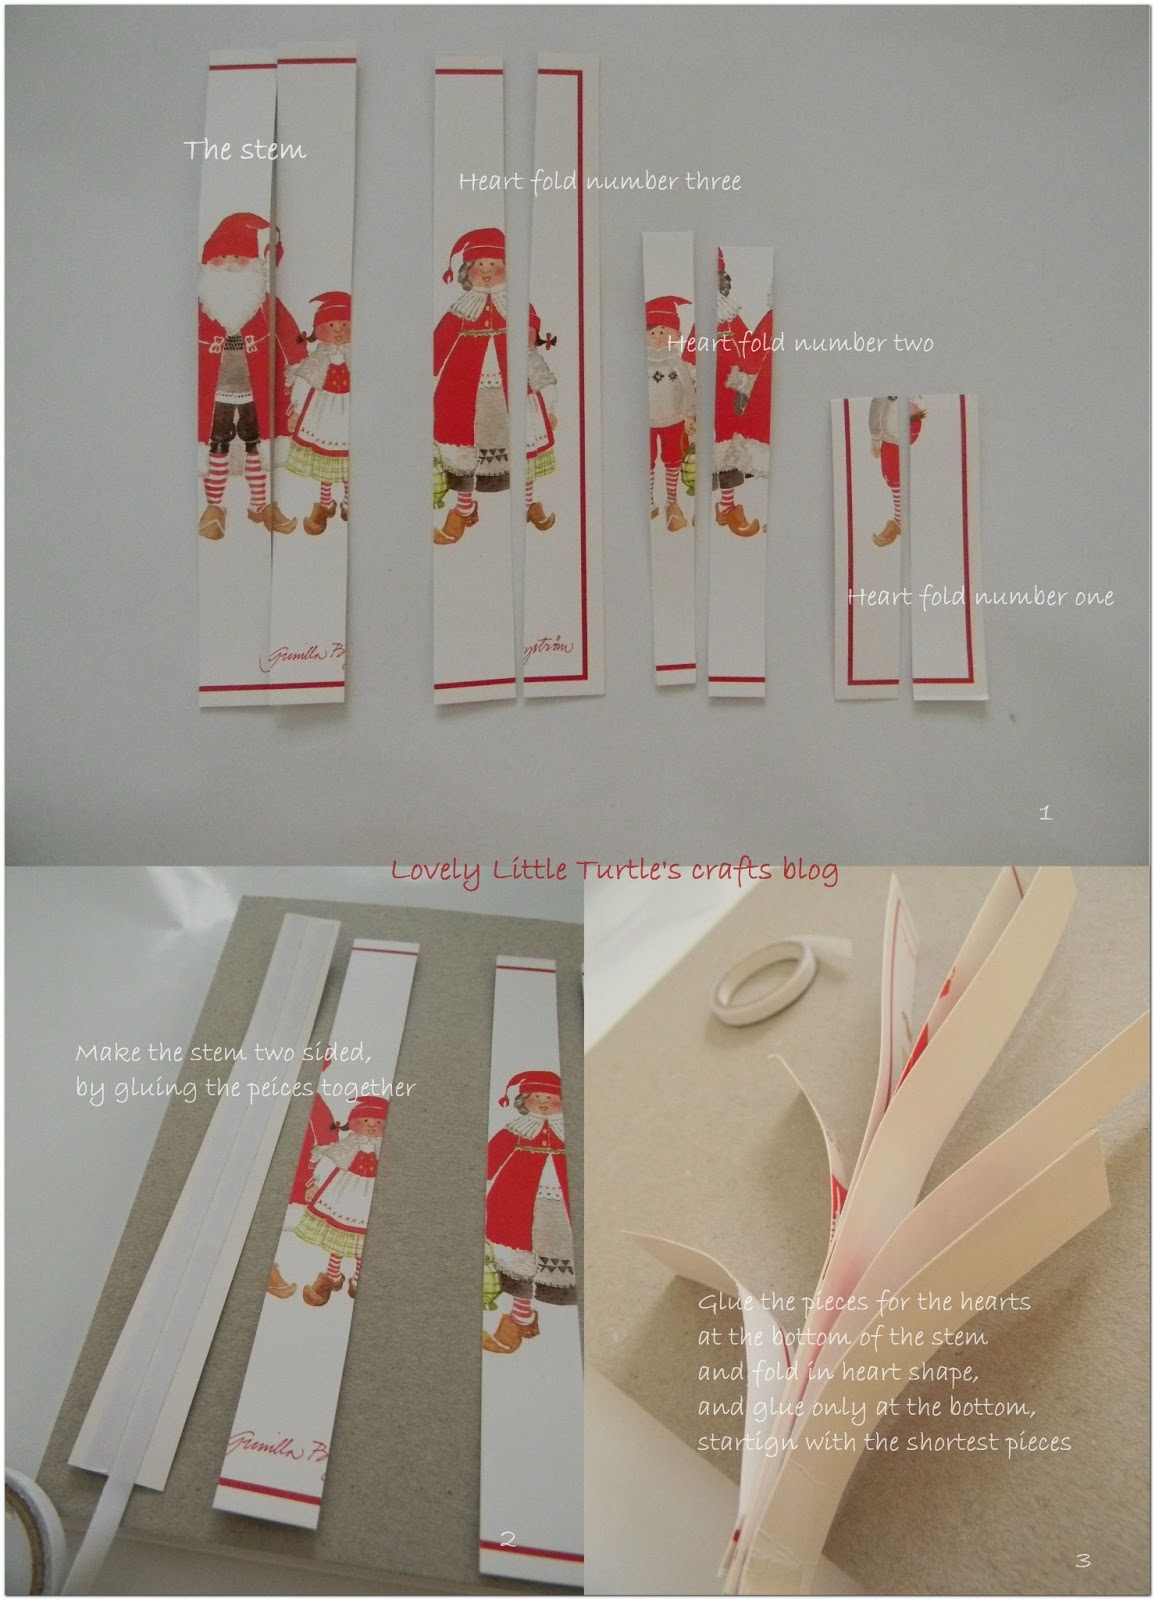
Step number two: Making the stems 


The making of the stems is quite easy. I used different green colored paper. Cut 0,5 cm wide lines along the length of the paper, glue the grill sticks and roll the paper over the sticks as shown on the picture under. Really easy! One advice, make sure its highness - THE GLUE :) is equally spread along the sticks and do not use cardboard paper, as is fold more difficult.

Once the stems are done and dry, use the sharp end of the grill stick and place it in the middle of the flower. (instruction 6 in the image down). If you have been using the glue gun, you'll find that rather easy to complete, as the glue from the gun forms quite good solid mass. 

Making the stems of the paper flowers

Ones the stems are at their places, the result is simply wonderful! Isn't it? 

Paper flowers with ready placed stems 


And the last step is the making of the leaves and the final touches.


Step number three: Making the leaves 


Making the leaves is the finishing touch of the process and by far the easiest. You can use different colors paper and shapes for them.  

Making the leaves of the flowers 


I particularly like the leaves made with the quilling technique. 


And you are ready!

DIY paper flowers from muffin / cupcakes liners

As I have mentioned above, the flowers were complimentary to a gift to a six years old girl and I decorated a ordinary metal tin can with a congratulatory card to complete the gift. As I have always said, you don't always need branded products to make something wonderful. 


From muffin liners to lovely paper flowers

So, get yourself armed with a little bit of patience, muffin liners and give someone a reason to smile. If you don't have muffin liners/ wrappers are home, but you are supplied with a color printer, I have up-loaded here a  design of muffin liners, that you can print and use to make either flowers or simply cupcake wrappers.


DIY Cupcakes/ Muffin wrappers printable 


Good Luck!


Saturday, February 16, 2013

Valentine's day card in purple


Purple rain card for St. Valentines


This year I decided to join the monthly competition by Sinelli's blog "Valentine's card without red or pink" (the blog is in Finnish and for those who are wondering what is Sinelli - it is one of the biggest crafts stores in Finland or wonderland for me).

So, Valentine card without red or pink? Nice and.... yes, challenging. So I though, and thought... and after reorganizing my crafts stash several times (it is good that my husband is not aware the amount of staff for crafting I have, :))))) , I came up with purple. 

So here comes the list for the needed materials: 

yarn - for knitting the purple heart
thread - first time sewing a card
card base
paper  "Victoria and Albert V&A" by Papermania
a patch for fabric
gems
ribbons in purple and white
lace ribbon
glue 
printed text 

This rather simple card requires a bit of preparation - the heart I knitted myself, for which I need to modestly share I am quite proud of, as I am now learning to knit (just two months ago I started).

knitted purple heart 

Although, I big amateur in knitting, I manged to came up myself with the stitches I had to knit to achieve the heart pattern. Knitting with this thin yarn and needles size 2 was new for me and I had made some mistakes, but nevertheless I think it suits the vintage look of the card. However, to be honest, I realize that I miss the smooth and professional look of an experienced knitter's work, but I just have to practice more. Once the heart was ready I decorated it with the lace ribbon and two flower shaped purple gems. 

Additionally, I sew the card just to add some more decoration. I've seen other sewed cards and I find that this technique adds quite nice and adds different touch to the card. The birds decoration is a glue patch for clothing and I had a big dilemma, if I want to use it (not that I don't like it, the opposite - I like it a lot, to place it on a card, but there it is now...). 

And the rest it some ribbons and text...and this is it! 


Valentine's day card in purple


The card was not chosen as a winner, but if you look at Sinelli's blog page it was very tough competition. 

And last but not least.... I couldn't help but hear Prince's song "Purple rain", while I was writing this post, so if you have reached the end of the post, please click here and enjoy the song ( I respect Prince quite a lot as an Artists :) ).  

That's all from me today. I hope you have had a wonderful Valentine's day in a purple rain ;).

Sunday, January 27, 2013

Recycle your old Christmas cards

Collection of six years Christmas cards
It is the end of January and high time already to take away from the shelves all the Christmas cards from last year. 

But what to do it them? 

Hmm....if you are a sentimental pack-rat, like myself :) you can collect those cards, put them in a box and occasionally have a look at them remembering the years back.... 

... or you can throw them away ( I am not even going to comment on the horror that option brings me-  :)))))

... or you can give new life to those cards, which is a nice compromise and a fun project to do. 


So in this post I will offer you three ideas how to give new life to your last year's Christmas cards. 

Or I will show you how to make: 

Reuse your old Christmas cards

1. Paper ball

2. Paper heart 

3. Paper Wreath

These are very easy to complete projects. It took me around half an hour for each one of them with the cutting of the cards, which I am  not a very big fan of. 


Cutting the cards into pieces

As I mentioned before, these are very easy projects and the hardest thing to do for me actually, was selecting the cards I needed to destroy. As I could not make that choice, so I simply used cards I've bought few years back, before I discovered my passion for paper-crafting, but have never sent them to anyone. 

So, simply pick up few cards and cut them into straight lines along the length. I used my paper cutter for that purpose- easier, faster, less headache and always straight lines.  If you don't have one, no worries, a ruler and a pencil will supply you with directions for the necessary result and if you have steady hands, which I don't (so I have a paper cutter :) ), then you are all set. Once cut, then choose theme and color compatible pieces to achieve a nicer effect. 

Generally one card is enough for making the ball and the heart, but the wreath took almost two large ones.
And here they are, the instruction by a project: 


Project number one: Paper Ball 


Paper ball as a Christmas tree decoration

Needed materials: 

12 - 13 pieces of an old Christmas card cut into 10 cm x 1 cm 
Fast drying glue
a ribbon for a hanger
optionally - additional decoration (I used a button)

I will suggest you to use fast drying glue, because you really do not want to hold the peaces together for more than a minute or two. The additional decoration is optional, I just thought that this button looks nice there. I tried to document all the instructions with step by step pictures, so I hope you will find it easy to follow.


Steps to make a paper ball from last year's Christmas cards


Project number two:  Paper Heart

Paper Heart


Needed materials: 

Old Christmas cards cut into: 
  two times 20 cm x 1,5 cm - for the stem
  two times 10 cm x 1,5 cm - heart fold number one (the smallest)
  two times 15 cm c 1,5 cm - heart fold number two (middle)
  two times 20 cm x 1,5 cm - heart fold number three (the biggest)
glue
ribbon 

I tried documenting the steps again, but when putting the instructions together, I notices I have failed to document all steps. 

However, if you follow the steps in the picture, it's very easy to make the hearts. I made the stem of the decoration two sided, so it will be nice to be seen from both sides, but when I was done with the hearts, I thought that it could be nice to have the hearts two sided too. On the other hand, my cards were empty, and when you use really mailed Christmas cards, there will be handwriting or post stamps left overs in the inner side, which is nice too. 

One advice, I would give is not to cut the pieces too short as cards are usually made of thicker paper or card board and small pieces are hard to bent in circular shapes. That is why 10 cm length was the smallest I could use. 

Making a paper hearts Christmas tree decoration 


And here it is....


Project number three: Paper Wreath 


Paper Wreath
Needed materials: 

Two old Christmas cards cut into: 
  18 pieces cut into 10 cm x 1 cm - level one of the wreath
  18 pieces cut into 10 cm 0,5 cm  - level two of the wreath
  12 pieces cut into 2 cm x 0,5 cm - for the center of the wreath
cardboard template cut into wreath shape - or a doughnut shape 
glue
ribbon 

Steps of making a paper wreath from old Christmas cards 

Follow the instructions in the image to achieve the desired result. The third level of the wreath (with the small pieces) is not necessary but it gives a great finishing touch. You can achieve that gluing a ribbon, or buttons or anything else theme suitable as well. 

Well, this is it this time. Rather long, but I hope inspirational for you post. And remember you can use these instructions for any other seasonal or non-seasonal projects you have. I just thought that these three items make wonderful Christmas tree decoration and this way all the nicest wishes your friend put into sending these cards to you will still be there with you every Christmas. 

Good Luck! 

New life for your old Christmas cards


Saturday, December 29, 2012

Christmas cards series: Holiday Romance

I have been planning to publish this page earlier, but time around the holidays felt more scarce than I expected. Although, I had help at home, still less time for Internet. Gosh, time do fly! Christmas used to be running around the house, TV and fun, and now it seems to be running around the shops and fun in the kitchen :), although I have to say it is still fun, just different kind of fun.

But now, topic related. Here comes the second part of the Christmas cards I have done. This part I have named: Holiday Romance, as I think the cards here have a romantic spirit, or at least I have tried achieving one when making them. Most cards are made with paper from either Sinelli or Tiimari and some additional decoration. As in the last post I will write some explanations, if there is some special technique used. 

So here they come: 

1. Ribbon Affair


A card for a relative, who likes ribbons and accessories, so in my opinion fits perfectly. Correct guessing-  a female relative and her family :). I have used the 3D decoupage technique on some of the Christmas tree balls, and to avoid giving in to the kitsch, I did not placed ribbons on each ball.  Other than that, very easy card to make. Right hand side bottom, the discrete sign 'Hyvää Joulua' is accompanied by a small adhesive green gem. I have to admit, one of my favorite cards, from this section, although modestly I need to share, there will be very many  favorite cards in this post :). 


2. Romantic Purple


This card I made first this Christmas. I was just back from the store with some inspiring new materials, so it took less than half an hour making it. 
Technique: embossed edges, 3D decoupage (the mistletoe patterned paper is placed above the simple snowflakes one), the congratulatory sign is decorated with brads, and the thread is from an old price tag - I keep all those threads, from clothing price tags, as they are usually very nice colors and good quality to recycle. 

3. Vintage Stories


Used materials: clear stamps by Papermania, heart shaped brad, lace ribbon. I am not a big fan of straight lines, I find them too trivial, so I intentionally left the upper lines of the white squares as they are.


 4. Tilda's Dream


Simple, yet very classy card. I love it! A card for my American professor, back from the university. Technique: embossed corners, 'Hyvää Joulua' sign from Sinooperi, background paper from Paparpack by Tiimari and....... the Chritmas balls, ah the Chritmas balls are from Tilda's World Collection

Who is Tilda? You have not heard about Tilda? That needs to be corrected immediately! 

Tilda is a reserved trade mark by the Norweagian designer Tone Finnanger and Panduro Hobby.  Distinctive characteristics of the Tilda products are the pink-red-white color combination and the vintage design of the products. Tilda range of product is vast, but probably the most popular ones are the crafts books and the adorable fabric dolls, which I dream to make  one myself someday. In case someone is keeping notes, I do accept Tilda's craft books and doll materials for gifts :). 


5. Angel of mine

'Hyvää Joulua' or Merry Christmas in Finnish

Technique: the white heart shapes for the angel's wings and the brad for the halo are by Tiimari, the 'Hyvää Joulua' sign and hand-crocheted flowers are by Sinooperi. Other than that, just my imagination playing around. And again - It's a favorite!


6. The Scent of Christmas 

'Hyvää Joulua' or Merry Christmas in Finnish

And....again, one of my favorite Christmas cards. I did warn you there will be many favorite cards in this post.  

I love the concept a lot! The transparent silk bag contains cardamon, cinnamon, clove and aniseed spices, so when you receive the card you will receive the scent of Christmas with it as well. I also put few tiny heart shaped confettis, as 'good love' :) wishes. 


7. Lace Snowflakes 


Ready snowflake die cut paper card base by Papermania, the additional small flakes I did myself with a snowflakes punch, and the heart in the middle is by Vivi Gade's Helsinki collection.


8. English Diamonds 


Technique: hand-decorated after stamping clear stamps by Papermania, lace ribbon, heart shaped brad and heart shaped embossed motive on the light red square, around the brad. As my husband pointed out the background color of the card base is English red and this card did leave for England.


9. Noel 


Noel or Christmas in French. Just a nice, happy and asymmetrical combination of colors and shapes. As I did mentioned before, I am not a big fan of straight lines, unconventionality is soooo much more fun! 


10. Season Greetings

With the glitter snowflakes I tried a new technique here; border rub-on. Might sounds complicated, but surprisingly easy. You need to buy a ready made package of rub-on shapes, which are practically two sided  transparent adhesive tapes; one of the sides is placed on the paper and the other is sprinkled with glitter. After that experiment, I did try to do my own glitter snowflakes, and I succeeded quite well - in the card number 10, under I have used that technique. I will devote a whole post about that, as it is very easy to make and the effect is nice. 

For the rest of the materials, you might be curious to know that I did recycle a plastic tag from a clothing. 

11. Glitter Snowflakes 


This is the card, with which I tried to make my own glitter snow flakes. You can see them on the dark background.


12. Miss Elisabeth 

'Hyvää Joulua' or Merry Christmas in Finnish


The same concept as the number six car- the Scent of Christmas, just a bit different background. A card for our beloved and dear friend, whom I have disguised with the name Miss Elizabeth. The "most wonderful creature" in the world as we call her at home :) .


13. Mini dreams part two


As in the previous post, there was a smaller card, this one is small too. It is 10 x 7 cm. In addition: a cross close envelope.


14.Rusetti (or Ribbon in Finnish) 

'Весела Коледа' or Merry Christmas in Bulgarian

The name says it all. There is a huge paper ribbon on that card :). The card is in Bulgarian and I wrote the sign myself. I have to admit, I am not very skillful with written signs. I need to work on that, if that is possible to improve, at all. 


15. Last Story

'Hyvää Joulua' Merry Christmas in Finnish

Or literary the last Christmas card, I made this year. For our lovely neighbours.


Well, this is it. All the Christmas cards I made this year in the last two post. Although, late I do hope that the reader can find some inspiration for any future projects here.

Till the next time!

By then, please accept my warmest wishes for a holiday romance :). 


Sunday, December 23, 2012

Christmas cards series: Home Classics

It took me a while to have this post ready, but I hope it will be worth for the reader.  As I have mentioned before, we do send quite a bit of post cards every year, or at least we think we do, if 30 Christmas cards is considered a lot. However, making 30 cards was time consuming for me. I think I get a little impatient at the end to start sending them already. 

But, but,... enough rambling, here they are, the first part of the Christmas card in this post. The cards you will see here are collected under a common theme called Home Classics. All the colors and decorations used remind me of the Christmas spent at home as a child with my parents, the fireplace, red woolen knitted socks we would rather need to wear to keep us warm than hang :) , the Christmas tree decorated with classic round glittering balls - very fragile and easy to break, all the gifts wrapped in deep red paper decorated with red ribbons,.... and the smell of granny's pumpkin pie (traditionally in Bulgaria consumed as a Christmas dessert) served on a hand crocheted table cloth. Ah..... the childhood memories... 

Back to the cards here. Many of them are made by just combining a paper base, scrap-booking paper and some decorations. For those that a bit different technique is applied I will write a short explanation. 

Well, and the cards:

1. Snowing Heart 


All materials are from Tiimari and Sinelli stores. The Christmas wishes at the bottom are made using clear stamp by Papermania.  


2. Checked Snowflakes

Paper and snowflakes from Sinelli, the brown cardboard and 'Merry Christmas' sign saved from last years' Christmas gifts and the ribbon is from Vivi Gade's Helsinki collection.


3.  Santa's little helper 

'Hyvää Joulua' or Merry Christmas in Finnish
This card was inspired by my friend Katja, who makes wonderful cards. So I used her idea, from a card I've received from her two years ago and added some of my own design. I wanted to keep the look clean and simple, just three colors in total and to further exalt background I used paper tearing as a distressed technique.


4. XmaX Christmas


This card screams 'I do recycle' . All materials are left overs from other projects, and yet this is one of my favorite cards from this season. I like the 'old cowboy ranch' look of the card and it all happened by chance. As you can see I've intentionally rumpled and teared some of the paper of the card to intensify the effect.

And YES! It does say XmaX on purpose- as the card was intended to two of our friends who like to take it to the maX, so I played around with the words. :)


5. Oh tannenbaum!


Well, very obvious a Christmas tree, but I have to admit that I am very prod of this design. I was lucky to find the background papers that have similar patterns (from two different sources and as a matter of fact one of of them I bough as a single piece of scrapping paper from the Hand-Crafts fair  in Helsinki in November'12), but both paper make a perfect match. If you look carefully at the corners I've used embossing technique for relief, again matching design to the background paper. The tree effect is made with Xmas tree shaped confettis and the brad is by Ho Ho Ho Funky Brads series by Dove Crafts.

6. Heart chaped mirror 


 Ribbon from Vivi Gade's Helsinki collection, corners effect with Fiskars' corner punch.


7. Sock Story


Also one of my favorite cards. Childish and charming, very easy to make and meant to make you smile. It was sent to our dear friends, who left Finland and moved to Austria recently. I wanted to give them a reason to smile when them open the envelope. The card was in combination with warm slippers and socks, presents for both of them.


8. Candied card 

'Hyvää Joulua'  or Merry Christmas in Finnish

Though the name, the card's appearance is quite simplistic. I was aiming to achieve a Christmas package resemblance. I've recycled a chocolate candy celofane :) and used two types of ribbons and Papermania clear stamp. 'Hyvää Joulua' stickers from Sinelli. 


9. Crochet memories 


I bough the crocheted lace trim from Tiimari, clear stamps by Papermania, pack-thread from the kitchen :), and embossed upper dark red piece of paper. 


10. and 11. The Round Set 


Although, different I've put those two cards together, because of the round center piece decoration. I should point out that I've personally draw and cut the circles on the card on the right, as I still refuse to buy cutting dies :). 

12. Glitter Tree

'Hyvää Joulua' or Merry Christmas in Finnish

Again a card inspired by my friend Katja. The idea of the glitter glue Christmas tree came from her. The rest of the card I put together. I found out that glitter glue is so easy to use and the result always seems to be nice. I've additionally decorated some of the background paper with the red glitter glue. The 'Hyvää Joulua' sigh is from Sinooperi.


13. Mini dreams


This card is small, as the title suggest - 10 x 10 cm and for making it I've used clear stamps and a hearts decorated red ribbon. This was one of the first times I tried using clear stamps and I was quite happy from the result of white ink on red paper. I still need to improve my technique, but I am definitely going to use clear stamps more often. 


Well, that was with the cards from the first series - the Home Classics edition. Although, a little bit late for Christmas I hope these cards can give you inspiration for your future crafting projects. 

Good Luck! and Merry Homey Christmas!