Showing posts with label Tutorial. Show all posts

Sunday, March 22, 2015

Knitted warm baby hats (and mittens)

Knitted baby hats


A new year has already begun and I missed all the opportunities for posts with Christmas ideas, (and St.Valentines tips as a matter of fact) and not that I don't have any ideas, I simply lack time...., or decent organizational skills as a mother of two kids (these are really hard to get - the decent organizational skills, as motherhood is filled with unexpected turns of events. Just this morning, when I thought that we have steady waking up routine around 8:00, my younger daughter woke up at 5:20).  Veeery nice! 

I've always prided myself on being good at organizing others, but parenthood proves me wrong. It is such a overwhelming duty, you either want to spend all your time with your little ones or you  just want to escape from them with Alice in "No Kids Ever Again Wonderland".  Well, no regrets have ever been shedded, but it is true that life is so much simpler without kids. You just have time for whatever you want, and oh, the simplicity to enjoy time.... But also it is true that when you have kids, you realize you have never before been happier. :)

'Children are not things to be moulded, but people to be unfolded' Jess Lair

Well aaaaanyway, this was supposed to be a post about knitted baby hats, not about my misconception of time. It is true however that with the scares bit of time I have, I craft more than blog. Knitting has been very relaxing lately and I have managed to complete few projects. And proud to say my first own design of (baby) hats.  Well, here it is:


Knitted baby hats pattern:


Free pattern for knitted baby/toddler and kids hats 

Needed materials:

  • Yarn - Novita Isoveli (75 % wool and 25 % polyamide) - main color A and a bit extra color B
  • Socks needles - size 5   
  • Time: around 4 hours/ hat for a slow knitter like myself :) 

Pattern:

Before I start writing, I need to warn you that I have not mastered the secret Morse code of writing knitting patterns :) and if something seems a bit confusing, don't hesitate to ask in the comments.

Here it comes:

Baby Hat for 3-9 months old (the burgundy hat in the picture)

Cast off 60 stitches and distribute over to the socks needles - 4 x 15 stitches (or 15 stitches per needle). Start with the main color A.

1. K3, P2, rep to end of rnd, 6 rnds  for making the ribbing of the hat
7. YO, 3x1 (by K only the middle st and transfer the neighboring sts over the knitted middle one, follow the same pattern when transferring, first the left st, then the right), YO, 2K, *to end of rnd
8. K all * to end of rnd
9. (Change color B) YO, 3x1 (by K only the middle st), YO, 2K, rep to end of rnd
10.  K all * to end of rnd
11. (Change to color A)  YO, 3x1 (by K only the middle st), YO, 2K, rep to end of rnd
12.  K all * to end of rnd
13. ( still Color A) YO, 3x1 (by K only the middle st), YO, 2K, rep to end of rnd
14.  K all * to end of rnd
15. (Change color B) YO, 3x1 (by K only the middle st), YO, 2K, rep to end of rnd
16.  K all * to end of rnd
17. (Change to color A)  YO, 3x1 (by K only the middle st), YO, 2K, rep to end of rnd
18.  K all * to end of rnd
19. (still Color A) YO, 3x1 (by K only the middle st), YO, 2K, rep to end of rnd
20.  K all * to end of rnd
21. (Change color B) YO, 3x1 (by K only the middle st), YO, 2K, rep to end of rnd
22.  K all * to end of rnd
23. K13, K2Tog, rep to end of rnd.
24. K12, K2Tog, rep to end of rnd.
25. K11, K2Tog, rep to end of rnd.
26. K10, K2Tog, rep to end of rnd.
27. K9, K2Tog, rep to end of rnd.
28. K8, K2Tog, rep to end of rnd.

Cut yarn. Weave through remaining sts and tie off. Weave in ends. And you are done!


Baby Hat 9-24 months old (the white hat in the picture) 

Cast off 65 stitches and distribute over the needles or 3 x 16 stitches and 1 x 17 stitches. Start with the main color A.

1. K3, P2, rep to end of rnd, 9 rnds  for making the ribbing of the hat
10. YO, 3x1 (by K only the middle st and transfer the neighboring sts over the knitted middle one, follow the same pattern when transferring, first the left st, then the right), YO, 2K, rep to end of rnd
11. K all * to end of rnd
12. (Change color B) YO, 3x1 (by K only the middle st), YO, 2K, rep to end of rnd
13.  K all * to end of rnd
14. (Change to color A)  YO, 3x1 (by K only the middle st), YO, 2K, rep to end of rnd
15.  K all * to end of rnd
16. ( still Color A) YO, 3x1 (by K only the middle st), YO, 2K, rep to end of rnd
17.  K all * to end of rnd
18. (Change color B) YO, 3x1 (by K only the middle st), YO, 2K, rep to end of rnd
19.  K all * to end of rnd
20. (Change to color A)  YO, 3x1 (by K only the middle st), YO, 2K, rep to end of rnd
21.  K all * to end of rnd
21. (still Color A) YO, 3x1 (by K only the middle st), YO, 2K, rep to end of rnd
23.  K all * to end of rnd
24. (Change color B) YO, 3x1 (by K only the middle st), YO, 2K, rep to end of rnd
25.  K all * to end of rnd
26. (Change to color A)  YO, 3x1 (by K only the middle st), YO, 2K, rep to end of rnd
27.  K all * to end of rnd
28. (still Color A) YO, 3x1 (by K only the middle st), YO, 2K, rep to end of rnd
29.  K all * to end of rnd
30. (Change color B) YO, 3x1 (by K only the middle st), YO, 2K, rep to end of rnd
31.  K all * to end of rnd
32. K14 (on one of the needle you have to K15), K2Tog, rep to end of rnd.
33. K13, K2Tog, rep to end of rnd.
34. K12, K2Tog, rep to end of rnd.
35. K11, K2Tog, rep to end of rnd.
36. K10, K2Tog, rep to end of rnd.
37. K9, K2Tog, rep to end of rnd.
38. K8, K2Tog, rep to end of rnd.

Cut yarn. Weave through remaining sts and tie off. Weave in ends. And you are done with the bigger hat too!

Or in other words, in order to make the hat's diameter longer, I increased it with 5 stitches, because that is how many stitches contain one pattern of the ribbing (or K3+P2 = 5 Sts).  And in order to make the hat bigger, I increased the hat with one more repetition of the color A and B (or with 6 rnds = 4 rnds color A and 2 rnds color B). With the same logic you can make this pattern from a pattern for a baby/ toddler hat to a pattern for an adult by increasing the diameter and the length of the hat. 

I also made baby mittens to match the burgundy hat, which design I copied from another pair of mittens and I will share with you in another post. The mittens and the hat were the initial a gift for a Naming Ceremony of a friend's daughter, but my friend loved the hat so much, so I received an order for a bigger hat (sounds funny, she just asked for another). Nice isn't it? A recognition of my first very own design of knitted baby hat :).

Knitted mittens for a baby

And this would be the gift bag for the hat and the mittens. I love simplicity in gift wrapping. Don't you? 

Simple gift wrapping idea

Tuesday, August 20, 2013

Crocheted basket from tricot yarn

Few months have passed since my last post. Summer is usually a busy season for us, as we travel outside Finland in July or August, and while in Finland we would like to collect as much sun as possible, so our family stays outside quite a lot. And all this unfortunately means no time for posting, but luckily enough it still means time for crafting.


This June I managed to complete a late birthday gift to a friend - a crocheted tricot yarn basket. Although two months late (oops!), the basket turned out quite nice and it was a good compensation (according to her reaction) for the time she had to wait for her birthday gift. Well, it's one of a kind :), so compensatory enough, I think :))... (oh, modest me!).  


But enough about me, more about this lovely basket by Me. :)))) 


You'll be curious to know that this basket even though its huge size, stitches wise, it's not a lot bigger than another basket project of mine - the Paper Straw Yarn Crocheted Basket. The inspiration for this basket came from Liz's wonderful blog - Crochet in color, although I used different yarn (tricot yarn) I did use her technique for the bottom of the basket. And one more difference, the bottom of the basket I made was single crochet stitches only. As a matter of fact the whole basket is single crochet stitches only. 


So pretty much the basics: 

The size of the tricot yarn crocheted basket

Needed: 

  • around a kilogram of thick tricot yarn (I had a little left over). And mind the thickness of the tricot yarn, as this way the basket will stay firm and erected. Also before buying tricot yarn, check its flexibility and stretchability, the less it stretches, the firmer the basket will be. 
  • a crochet hook size 11.5 (American size 16)
  • around two weeks of an hour a day crocheting 


and the pattern: 

Bottom: 

Rnd 1: 6 sc in a circle. Join with sl st.

Rnd 2: Ch 2 sc in each st. Join with sl st. (12 hdc)

Rnd 3: Ch 2 sc in same st, sc in next st * around (or 2 sc in every second st). Join with sl st. (18 sc)

Rnd 4: Ch 2 sc in same st, sc in next 2 sts, complete *times around (or 2 sc in every third st). Join with sl st. 

Rnd 5: Ch 2 sc in same st, sc in next 3 sts, complete *times (or 2 sc in every fourth st). Join with sl st. 

Rnd 6: Ch 2, sc in same st, sc in next 4 sts, complete *times (or 2 sc in every fifth st). Join with sl st. 

Rnd 7: Ch 2, sc in same st, sc in next 5 sts, complete *times (or 2 sc in every sixth st). Join with sl st. 

The process of crocheting a tricot yarn basket
Rnd 8: Ch 2, sc in same st, sc in next 6 sts, complete *times (or 2 sc in every seventh st). Join with sl st. (64 hdc)

Rnd 9: Ch 2, sc in same st, sc in next 7 sts, complete *times (or 2 sc in every eight st). Join with sl st. (72 hdc)


The bottom of the tricot yarn crocheted basket
Rnd 10: For completing the bottom, as mentioned I've used Liz's technique, and I would recommend her explanations, for many reasons, but mainly that I could not possibly explain them clearer. 

Basket: 

Rnd 11- 20: Ch 1 sc in the same st  all around. Join with sl st. Repeat *.  

Rnd 21: Ch 1 sc in the same st  in 11 st around, ch 12 chs over the basket and join over with sc in the 10th sc on the edge of the basket (this will make the handles of the basket. If this explanations if not clear enough, I apologize).  Ch 1 sc in the same st in the next 21 st around and then ch 12 chs and join over with sc in the 10th sc on the basket. Ch 1 sc in the same st  in 11 st around. Join with sl st. 

Rnd 22: Ch 1 sc in the same st *times around (over the handles as well). Join with sl st and complete. Cut the yarn. 

A tricot yarn crocheted basket can be very handy used for storing pretty much anything

And this was it. The basket turned out quite nice and spacious. I am actually planing to make a bit bigger one for my daughter's toys, and may be next time try a square one. I hope all instructions were comprehensible (if not please ask), as I have said before, I am still learning. Good Luck to all!


Thursday, March 7, 2013

DYI Muffin liner paper flowers


Muffin liner flowers
I like flowery themes in general quite a lot - vibrant bright colors and wonderful combinations of shapes as well. You can't go wrong with choosing flowers for your crafts projects, they almost always provoke a smile.  

Colors is exactly what I need at the beginning of spring to keep me survive through the last weeks of snow. Yes, I said snow and weeks :) as Finnish spring usually makes an appearance around mid April or early May, so I have few more weeks left for flowers crafting :) to try to sustain my spring anticipation.

So here it is a "give-me-smile" project with paper flowers from muffin or cupcake liners. This project, I made for our friends daughter's sixth birthday, and hearing her "Wow!" was more than enough reward. 

If I need to rate the difficulty level of this project, I would probably say it is intermediate, not because it is challenging to complete, but because it requires some time and patience. But I promise that the result will totally worth it. 


So here it comes the needed materials: 


Needed materials for muffin liners paper flowers


Colorful muffin / cupcakes liners
green paper for the stems and the leaves
grill sticks for the stems 
fast drying glue and/ or glue gun
scissors
pencil for drawing leaves
puncher with flower shape
Optionally:  congratulatory sign, metal tin 

I have prepared three picture tutorials how to create the (1) flowers petals, (2) the stems and (3) the leaves. I hope that they will be explanatory and inspirational enough.  


Step number one: Making the flower petals


The nice thing about the muffin liner flowers is that the petals are made from one whole piece of paper and once the flowers are completed the result is simply gorgeous -no cutting and gluing lines or breaking of the shapes and colors, just smooth natural circles. 

Flower petals from muffin / cupcakes liners

Start the process by cutting the bottoms off the muffin liners, which later on you will be able to use for the middles of the flowers. If you are making more than one flower, like I did you can mix and match the muffin liners' bottoms with the different flower petals. I used the puncher to create the middles of some of the flowers or for others simply the bottoms slightly trimmed.

Make sure that, while gluing the petals with the glue gun, you have placed paper at the middle of flowers at the rare side too, otherwise your flower will get stuck to your work table, and you don't really want that ;)!


Easy to flow steps to make flowers from muffin liners

The rest of the steps are easy to make, just follow the instructions in the images. Using the glue gun was new for me, but I have to be honest that it makes the life of the ordinary crafter much easier. It dries so fast and effortlessly that you will be wondering how you have ever managed without it. 

Before I got addicted to crafts, I had no idea that glues are so diverse and that more than one type will be needed for a single project. Which reminds me a situation at home, when a month a go my husband asked me to loan him "some glue". So I asked "What kind of glue?", he seemed to be puzzled "What do you mean?", he replayed. :)))). Then I had to explain "I have many kinds of glue, for various purposes. Define your need." He did laugh at me and shook his head. :))))) 

And READY! Lovely flowers from cupcake liners

Although the glue gun was rather appropriate for fast and easily transforming the muffin liners into beautiful flower petals, I used all purpose glue for decorating the middles of the flowers, because it is smoother look that leaves no relief. And this is all with the glue types and the flowers ..... for this step.


Step number two: Making the stems 


The making of the stems is quite easy. I used different green colored paper. Cut 0,5 cm wide lines along the length of the paper, glue the grill sticks and roll the paper over the sticks as shown on the picture under. Really easy! One advice, make sure its highness - THE GLUE :) is equally spread along the sticks and do not use cardboard paper, as is fold more difficult.

Once the stems are done and dry, use the sharp end of the grill stick and place it in the middle of the flower. (instruction 6 in the image down). If you have been using the glue gun, you'll find that rather easy to complete, as the glue from the gun forms quite good solid mass. 

Making the stems of the paper flowers

Ones the stems are at their places, the result is simply wonderful! Isn't it? 

Paper flowers with ready placed stems 


And the last step is the making of the leaves and the final touches.


Step number three: Making the leaves 


Making the leaves is the finishing touch of the process and by far the easiest. You can use different colors paper and shapes for them.  

Making the leaves of the flowers 


I particularly like the leaves made with the quilling technique. 


And you are ready!

DIY paper flowers from muffin / cupcakes liners

As I have mentioned above, the flowers were complimentary to a gift to a six years old girl and I decorated a ordinary metal tin can with a congratulatory card to complete the gift. As I have always said, you don't always need branded products to make something wonderful. 


From muffin liners to lovely paper flowers

So, get yourself armed with a little bit of patience, muffin liners and give someone a reason to smile. If you don't have muffin liners/ wrappers are home, but you are supplied with a color printer, I have up-loaded here a  design of muffin liners, that you can print and use to make either flowers or simply cupcake wrappers.


DIY Cupcakes/ Muffin wrappers printable 


Good Luck!


Friday, February 8, 2013

DIY baby pocket bib

What else can make you smile more than a child's excitement when you make something for him/her? Well, it is a rhetorical question for me. Nothing. Of course :). 

Do it yourself pocket bib


This is the purpose of this post; to share with you the excitement of my 1,8 years old daughter when I made 
this bib for her (and one her bunny). 

I like easy and cute craft ideas that everyone can do with as little hassle as possible. 
So, if you own a sewing machine and a little bit of patience, this can be a fun Saturday afternoon project, which will bring you also lots of gratitude (or at least that was the case with me and my baby-girl). 

This summer, I saw the bib pattern from a friend, who saw it from a friend. And I was intrigued by the idea to make one for for my daughter. I like sewing in general,  but unfortunately my Singer 8082 machine was a cheap and not very good purchase choice and I had to wait till have it fixed in order to make the bib. 

But finally, here it is ready and already in use. And I dare to say, my baby never said "No" to wearing this bib, as she saw me sewing it and when it was ready I explained it was made for her. Ah, the smilies! 


Needed Materials: 

waterproof fabric (the one I used is for raincoats- water-repellent from the outside and cotton from the inside) 
color suitable threads
double fold bias tapes
sewing machine

Chose materials for the bib

I chose colorful floral fabric suitable for a girl and few different one-color double fold bias tapes. Oil-cloths are very popular fabrics for making baby bibs, but I found out that oil-cloths are hard to fold (and you do need to fold the bib to carry it with you when your child eats outside), and once folded then it wrinkles permanently. Also food that collects in the pocket of oil-cloth bib if not washed thoroughly right away it may go mouldy. The fabric I used, as it states above is for raincoats. It folds easily and food can be wiped away with a wet paper cloth if you eat outside and once home you can simply hand-wash it (it also endures machine wash). 

Measurements of the bib

The pattern of the bib can be found in JPG at the bottom of this post. I used my friend's bib as a model, but I  made a little improvement to the original. I made the pocket (the crumb guard) wider than the bib base, so it stays open all the time and easily collects food.  

Moms will definitely appreciate this, I am very very sure... :)))) 

Measurement of the pocket (crumb guard) of the bib

And with the left overs from the fabric, I made a bib for my daughter's favorite stuff toy. :))))) 


Bib for the bunny

Good luck! I am sure your child, niece, nephew, cousin, friend's child etc... will love the result :) 


P.S. Please find here the pattern of the bib, and excuse my handwriting and drawing. ;) 


The bib pattern 


Sunday, January 27, 2013

Recycle your old Christmas cards

Collection of six years Christmas cards
It is the end of January and high time already to take away from the shelves all the Christmas cards from last year. 

But what to do it them? 

Hmm....if you are a sentimental pack-rat, like myself :) you can collect those cards, put them in a box and occasionally have a look at them remembering the years back.... 

... or you can throw them away ( I am not even going to comment on the horror that option brings me-  :)))))

... or you can give new life to those cards, which is a nice compromise and a fun project to do. 


So in this post I will offer you three ideas how to give new life to your last year's Christmas cards. 

Or I will show you how to make: 

Reuse your old Christmas cards

1. Paper ball

2. Paper heart 

3. Paper Wreath

These are very easy to complete projects. It took me around half an hour for each one of them with the cutting of the cards, which I am  not a very big fan of. 


Cutting the cards into pieces

As I mentioned before, these are very easy projects and the hardest thing to do for me actually, was selecting the cards I needed to destroy. As I could not make that choice, so I simply used cards I've bought few years back, before I discovered my passion for paper-crafting, but have never sent them to anyone. 

So, simply pick up few cards and cut them into straight lines along the length. I used my paper cutter for that purpose- easier, faster, less headache and always straight lines.  If you don't have one, no worries, a ruler and a pencil will supply you with directions for the necessary result and if you have steady hands, which I don't (so I have a paper cutter :) ), then you are all set. Once cut, then choose theme and color compatible pieces to achieve a nicer effect. 

Generally one card is enough for making the ball and the heart, but the wreath took almost two large ones.
And here they are, the instruction by a project: 


Project number one: Paper Ball 


Paper ball as a Christmas tree decoration

Needed materials: 

12 - 13 pieces of an old Christmas card cut into 10 cm x 1 cm 
Fast drying glue
a ribbon for a hanger
optionally - additional decoration (I used a button)

I will suggest you to use fast drying glue, because you really do not want to hold the peaces together for more than a minute or two. The additional decoration is optional, I just thought that this button looks nice there. I tried to document all the instructions with step by step pictures, so I hope you will find it easy to follow.


Steps to make a paper ball from last year's Christmas cards


Project number two:  Paper Heart

Paper Heart


Needed materials: 

Old Christmas cards cut into: 
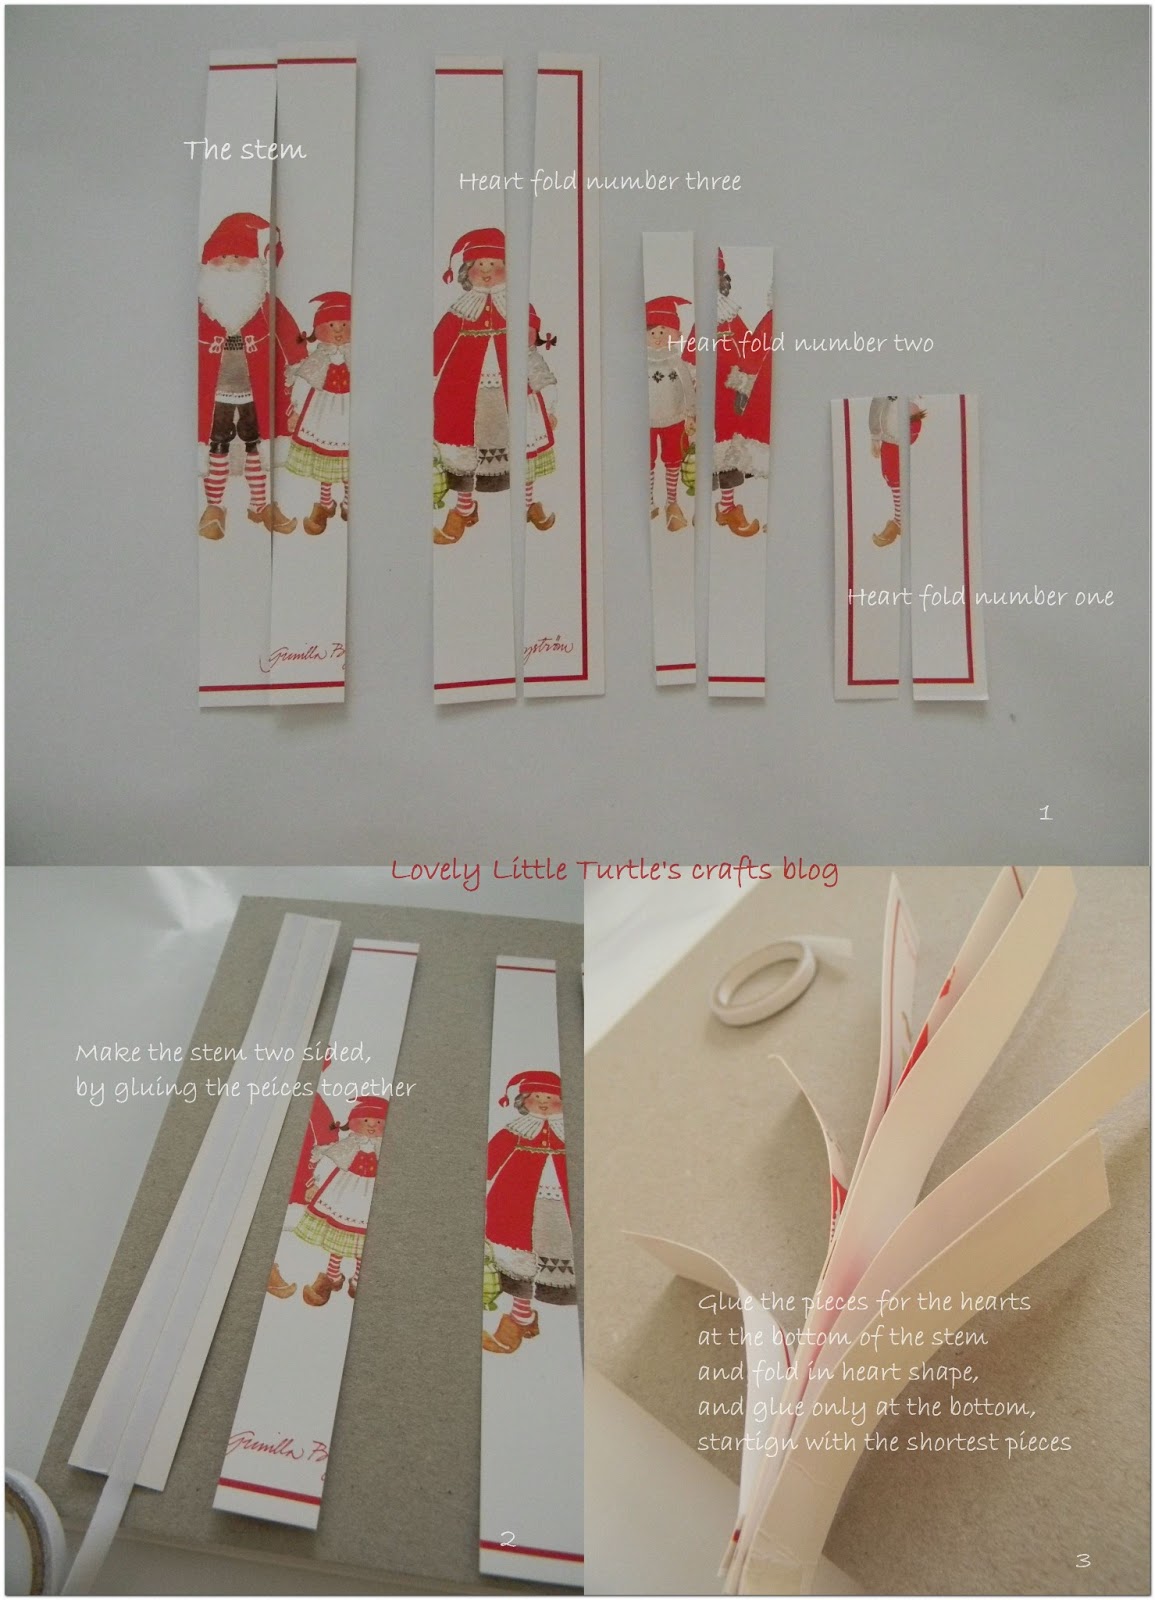
  two times 20 cm x 1,5 cm - for the stem
  two times 10 cm x 1,5 cm - heart fold number one (the smallest)
  two times 15 cm c 1,5 cm - heart fold number two (middle)
  two times 20 cm x 1,5 cm - heart fold number three (the biggest)
glue
ribbon 

I tried documenting the steps again, but when putting the instructions together, I notices I have failed to document all steps. 

However, if you follow the steps in the picture, it's very easy to make the hearts. I made the stem of the decoration two sided, so it will be nice to be seen from both sides, but when I was done with the hearts, I thought that it could be nice to have the hearts two sided too. On the other hand, my cards were empty, and when you use really mailed Christmas cards, there will be handwriting or post stamps left overs in the inner side, which is nice too. 

One advice, I would give is not to cut the pieces too short as cards are usually made of thicker paper or card board and small pieces are hard to bent in circular shapes. That is why 10 cm length was the smallest I could use. 

Making a paper hearts Christmas tree decoration 


And here it is....


Project number three: Paper Wreath 


Paper Wreath
Needed materials: 

Two old Christmas cards cut into: 
  18 pieces cut into 10 cm x 1 cm - level one of the wreath
  18 pieces cut into 10 cm 0,5 cm  - level two of the wreath
  12 pieces cut into 2 cm x 0,5 cm - for the center of the wreath
cardboard template cut into wreath shape - or a doughnut shape 
glue
ribbon 

Steps of making a paper wreath from old Christmas cards 

Follow the instructions in the image to achieve the desired result. The third level of the wreath (with the small pieces) is not necessary but it gives a great finishing touch. You can achieve that gluing a ribbon, or buttons or anything else theme suitable as well. 

Well, this is it this time. Rather long, but I hope inspirational for you post. And remember you can use these instructions for any other seasonal or non-seasonal projects you have. I just thought that these three items make wonderful Christmas tree decoration and this way all the nicest wishes your friend put into sending these cards to you will still be there with you every Christmas. 

Good Luck! 

New life for your old Christmas cards


Sunday, January 13, 2013

Easy decoration for a frame


In this post, I would like to show you a very easy way to decorate and personalize a frame.

I like experimenting with new techniques and this is what came up when I decided to combine acrylic paint, a rubber stamp and a frame. This project was a part of the 'Thank you' gift for my yoga teacher, with which I started my blogging experience. If you are curious to read, simply scroll down and you will see it - post Number One. 

I wanted to have similar elements at the picture frame and the card, that is why I used the same rubber stamp and white acrylic paint.
Similar patterns
Although, the rubber stamp contained detailed instructions with what brand of ink I SHOULD be using it, I did not follow the instructions. I am not a big fan of branding instructions and with experience in marketing, I really really know what's the catch all about. So, I tried my own technique. And it did work! 

But, please do not accept that as an anti-branding propaganda, I just think that sometimes it's nice to try something else or new, though I need to admit, I have ruined projects by not following the instructions. Ops! (an ashamed face emoticon would be an appropriate one right now :) ). 

Well, well, anyway - this project succeeded nicely and was very easy to make. And it is wonderful! It just brings such a nice personal detail to a frame. 

So, needed materials:

Needed materials for decorating a frame

an wooden frame
rubber stamp
white acrylic paint
a brush to lay the paint on

Why acrylic paint?

Well, due to its properties, acrylic paint dries fast and you can achieve a nice relief of the service. Usually acrylic paint does not washes away easily with water, so it is perfect for purposes like this one.

Applying paint on the rubber stamp

Apply the paint over the rubber stamp, making sure that there is not excessive amount of paint on the stamp. Too much paint will smudge the image, too little will make it look pale. I would recommend you to try stamping few times on a separate piece of paper beforehand, so you can get a grip of the amount of paint you need to use.    

Applying pressure


Once you have mastered the technique, just bravely stamp over the frame. Apply pressure and wait for 15-20 secs before you separate the stamp from the frame. Leave the paint to dry as much as it needs - that usually depends on the amount of paint you have applied. If you are in a hurry, you can help the drying process with a hairdryer, but do not use it for cards. And I would really recommend to leave a day until you can use the frame for the necessary purpose. 

And this is it! You are ready! 


The frame ready for adding a painting


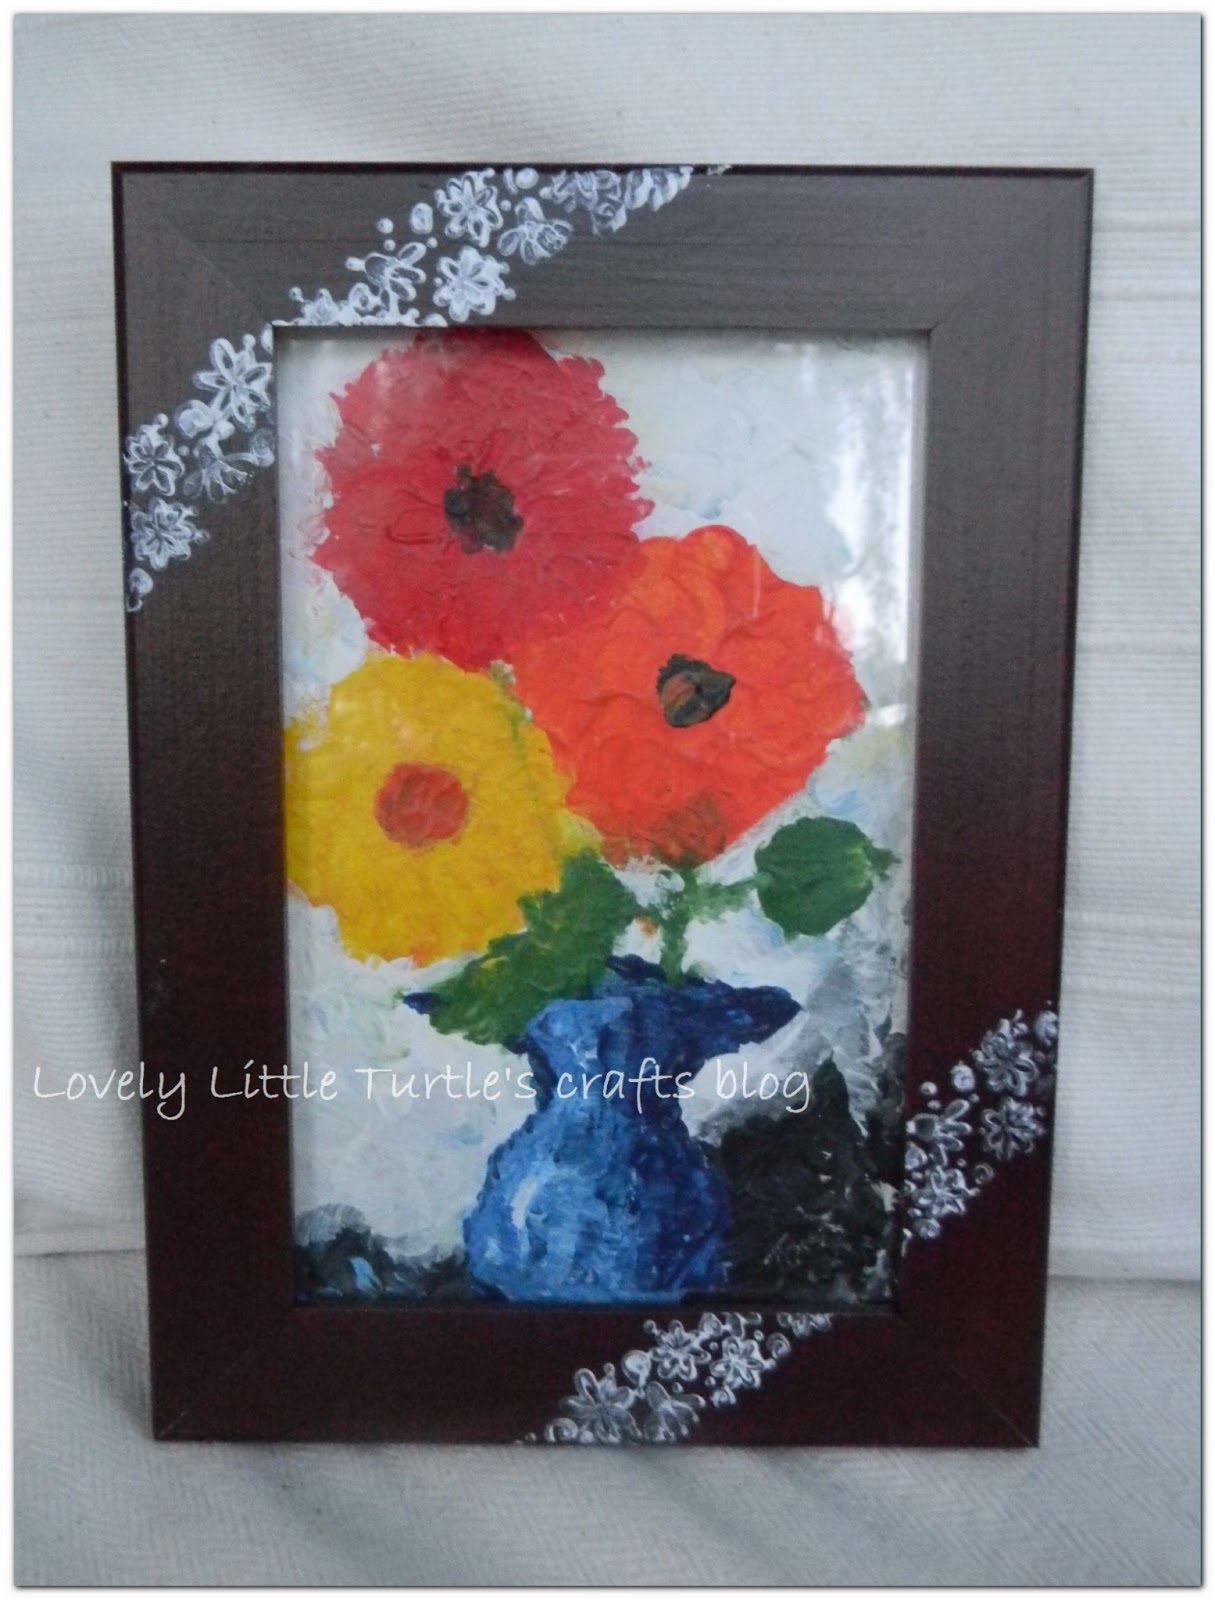
Add your picture, painting, photo, fabric, whatever you like.... For my yoga teacher, I also painted this picture of flowers. I used to like painting when I was a child, and decided to reconnect with that hobby of mine. 


Easy and lovely hand decorated picture frame
It's easy and the result is wonderful! 

P.S. I made the explanatory images with another wooden frame, as you probably see, but today when I wanted to up-date the blog, I realized that I haven't taken these pictures, when I decorating the frame. And the frame is already with my yoga teacher. 

Saturday, January 5, 2013

No sugar and no flour 100 % oatmeal home-made cookies

Strange title for a post in a crafts blog, isn't it? Well, you are correct :), but as you have noticed I left a tab for the so called 'Kitchen crafts', in which I could also include my kitchen crafts ideas as for example the curtains in our kitchen, which I made myself,  but this post will include some recipes, which I love making and happily share with everyone. 

Although, this is not culinary blog, along with crafting I do enjoy cooking as well and most of all I love baking. 

100 % oatmeal no sugar cookies
I bake cookies, cakes, muffins, strudels, biscuits (both in the American and British meaning of the word), focaccia, scones, breads, pies, quiches, tarts, tartalets, eclairs, etc.... ,everything that has to do with dough, and you need to begin from scratch. And I love it! A baking challenge? I am in, and although it may take few attempts till it looks and tastes right, I don't give up.

It could be a hereditary skill. My favorite grandmother is a great baker. I still keep in my memories the smell of freshly baked bread served for dinner or the view of the ready home-made filo dough, which we were not allowed to touch, so we would't damage the tender surface.

So, occasionally I will add here some of my favorite baking recipes and I hope they will inspire you too.


Choice number one has been rather humble as the title suggest. I am giving you my favorite recipe for no sugar no flour 100 % oatmeal home-made cookies.


But how did I come up with that recipe? A friend of mine visited me when I was in my ninth month pregnancy and brought freshly baked wonderful banana bread. I can't describe the smell and the taste of that bread :) but I can describe my disappointment as I could't have any of it - with the nine month big belly, I really had to avoid flour and sugar. So then I decided to make my own version of the banana bread. The result was this recipe.

No sugar and no flour 100 % oatmeal home-made cookies 


(makes around 14 pieces, 55 ccal/per one)

Ingredients:
No sugar no flour cookies

The ingredients are literary what you see on the image above :).

2 eggs
150 gr. oatmeal
5 tb.s. plain yogurt
1 banana (or 1/2 banana + 1/2 red delicious apple)
30 gr. raisins

Optionally:
20gr. linen seed

Mix the eggs together. Cut the banana (apple) into big chunks. Add all the ingredients together while mixing with a fork. Wait for a bit till the oatmeal soaks the yogurt and eggs. The consistency of the mixture can be seen in the picture under.

Consistency of the dough

Once ready, spoon the mixture onto baking paper and shape into cookies as much you can achieve such form :). Try to add at least one visible banana piece and couple of raisins per cookie.

Optionally, decorate with sesame seed.

Bake in pre-heated oven on 175 C, for about 15-20 minutes. Do not wait for the cookies to turn into golden brown, then it's too late and they become too dry.

Serving suggestions: as they are or with coffee, tea, or I like having them with my dried plums no sugar jam (dried plums softened for for 5 minutes in boiling water and when chilled mixed-in with a hand blender), but I strongly recommend you to try them as they are first. You will be surprised how sweet they are without any sugar added.

No sugar no flour 100 % oatmeal cookies


These cookies are simply your oatmeal porridge morning breakfast, but just in a different shape :). Rich on fiber, and with natural sweetness from the fruits they are perfect for your morning coffee break or afternoon tea time. If you wish to lower the calories, you can substitute the banana with an apple, the raisins with dried plums cut into pieces and use low fat yogurt. 

Bon Appétit! 


Friday, December 7, 2012

Card from wooden spatulas for Tamina's first birthday

My friend's daughter - Tamina, had her first birthday a month ago. A one year old toddler would not pay attention to a card, so I needed to come up for an idea that can be used for other purposes than just a card.

I had seen the idea for "wooden spatulas card" in a a website called Handmade-International, which is a website in Bulgarian full of various craft ideas. I find it comprehensive and inspirational enough.

So it was it - the wooden spatulas card. I particularly like this card idea for a child, it could be placed on the shelf, or could be hanged on the wall.


Materials for the card:

Do crafts wooden spatulas
other theme suitable wooden shapes
paint
coloring pencils
paper
glue for wood and metal

I found the wooden spatulas accidentally at the local book store. To be honest I was surprised that it was that easy, I though it will take me sometime to find what I need. I was even considering using coffee stirring sticks, tho a bit thin they would do. Good that Do crafts, had  already thought of how to solve my problem.
So, once you got the materials, it's rather easy.

You can arrange as many spatulas as you need. I used ten for the background and two to support the structure.

Wooden spatulas for the base

Choosing the background color


Ones arranged and glued together, the spatulas make quite stable structure to paint on. I wanted the card to look childish, as kids' made like (although, that is very good excuse to justify my painting skills :) ), so my general idea was just grass, sky, sun and clouds. I did intentionally left some pieces of paper on the surface of the spatulas, as painted over they will make it look rough, and it gave me the desired effect.

The paint I use was bough from the kids' section in IKEA. These water based simple colors fit fine with my  theme, as mentioned above I did seek the childish effect of the card.

the paint


The thematic wooden shapes I had bought sometime ago, because I liked them. They were plain, so I colored myself.

adding the theme suitable wooden shapes


My first idea was to place the girl and the flower in a pot one next to one another, but it did not work, so I had to disassemble the flower. The stem of the flower I used for making the congratulatory flag.

And this is it.


Good Luck to all!