Monday, February 25, 2013

Digital Scrap-booking


I am in love .... :)

AFTER - digital scrapbooking 


......with this new software for digital crafting, I am trying. Can you imagine? A software for digital crafting! Really? Do you think there is anything more perfect than that? :) . Photoshop is nice too, but not so specific for crafters like me.  And please, do not think I am a professional! I am hardly a professional in any crafts I do. It's all a hobby and a matter of spending wonderful time doing something I like that will make me smile. 

I am not going to brag all around the positive and negative features of the software, although at this point I am not finding any negative, except my slow advancing :) 

For the beginning, I am just sharing with you, two images of our autumn front door decoration with before and after the make over. And please, remember I am still learning. 

BEFORE -  digital scrapbooking 


Ahhhh.... wonderful, wonderful! 


Saturday, February 16, 2013

Valentine's day card in purple


Purple rain card for St. Valentines


This year I decided to join the monthly competition by Sinelli's blog "Valentine's card without red or pink" (the blog is in Finnish and for those who are wondering what is Sinelli - it is one of the biggest crafts stores in Finland or wonderland for me).

So, Valentine card without red or pink? Nice and.... yes, challenging. So I though, and thought... and after reorganizing my crafts stash several times (it is good that my husband is not aware the amount of staff for crafting I have, :))))) , I came up with purple. 

So here comes the list for the needed materials: 

yarn - for knitting the purple heart
thread - first time sewing a card
card base
paper  "Victoria and Albert V&A" by Papermania
a patch for fabric
gems
ribbons in purple and white
lace ribbon
glue 
printed text 

This rather simple card requires a bit of preparation - the heart I knitted myself, for which I need to modestly share I am quite proud of, as I am now learning to knit (just two months ago I started).

knitted purple heart 

Although, I big amateur in knitting, I manged to came up myself with the stitches I had to knit to achieve the heart pattern. Knitting with this thin yarn and needles size 2 was new for me and I had made some mistakes, but nevertheless I think it suits the vintage look of the card. However, to be honest, I realize that I miss the smooth and professional look of an experienced knitter's work, but I just have to practice more. Once the heart was ready I decorated it with the lace ribbon and two flower shaped purple gems. 

Additionally, I sew the card just to add some more decoration. I've seen other sewed cards and I find that this technique adds quite nice and adds different touch to the card. The birds decoration is a glue patch for clothing and I had a big dilemma, if I want to use it (not that I don't like it, the opposite - I like it a lot, to place it on a card, but there it is now...). 

And the rest it some ribbons and text...and this is it! 


Valentine's day card in purple


The card was not chosen as a winner, but if you look at Sinelli's blog page it was very tough competition. 

And last but not least.... I couldn't help but hear Prince's song "Purple rain", while I was writing this post, so if you have reached the end of the post, please click here and enjoy the song ( I respect Prince quite a lot as an Artists :) ).  

That's all from me today. I hope you have had a wonderful Valentine's day in a purple rain ;).

Wednesday, February 13, 2013

Vienna Loves us too

And we love Vienna.....

Before you get confused by the title of this post, I will explain why, you see such a title in the blog. But how to put a long story short, as I generally like long post :). But here it is. 


Last year our family visited Vienna in the beginning of May to celebrate out lovely daughter's first birthday. But why Vienna - you might ask? And the answer is "Where else but Vienna?". Vienna in the spring was just the right place to spend a romantic family weekend. And I will always remember, when we bought our daughter a piece of Schwarzwaldkirsche cake with a single candle and sang to her in Schonbrunn castle's cafe the "Happy Birthday" song. I don't know how much she understood the meaning of it until she was offered a piece  from her first birthday cake to taste, but we will always remember our excitement when people from the near by tables sang the song with my husband and I. 

Now I am sure, you understand why we love Vienna, but most certainly I can assure you that Vienna loves you too - the ordinary tourist, the every day romance seeker, the skeptic experienced  traveler, every one... Vienna does love you too, offering you to dance with her a slow flirtatious waltz where she would bend her spine of entertainment to fit your vibe. And you will not be able to get enough of it..... It is a promise. 

That is why, when I saw the ad for the competition "Valentine's Day Facebook Competition" by Vienna's Travel Board", I had to submit out picture too. 

And here it is: 

We love Vienna, and Vienna loves us too

It is a compilation of some of the most wonderful moments we spent there. And there is others, of course. I hope you will like that picture, as much as we do. 

More information about the competition and Vienna can be found here:  http://www.facebook.com/ViennaTouristBoard and here: http://www.wien.info/en/special/valentines

Click here to see and "Like" our picture. 

That will be all from me in this post, and I hope I have managed to convince you to visit Vienna. Soon. Very soon. 


Friday, February 8, 2013

DIY baby pocket bib

What else can make you smile more than a child's excitement when you make something for him/her? Well, it is a rhetorical question for me. Nothing. Of course :). 

Do it yourself pocket bib


This is the purpose of this post; to share with you the excitement of my 1,8 years old daughter when I made 
this bib for her (and one her bunny). 

I like easy and cute craft ideas that everyone can do with as little hassle as possible. 
So, if you own a sewing machine and a little bit of patience, this can be a fun Saturday afternoon project, which will bring you also lots of gratitude (or at least that was the case with me and my baby-girl). 

This summer, I saw the bib pattern from a friend, who saw it from a friend. And I was intrigued by the idea to make one for for my daughter. I like sewing in general,  but unfortunately my Singer 8082 machine was a cheap and not very good purchase choice and I had to wait till have it fixed in order to make the bib. 

But finally, here it is ready and already in use. And I dare to say, my baby never said "No" to wearing this bib, as she saw me sewing it and when it was ready I explained it was made for her. Ah, the smilies! 


Needed Materials: 

waterproof fabric (the one I used is for raincoats- water-repellent from the outside and cotton from the inside) 
color suitable threads
double fold bias tapes
sewing machine

Chose materials for the bib

I chose colorful floral fabric suitable for a girl and few different one-color double fold bias tapes. Oil-cloths are very popular fabrics for making baby bibs, but I found out that oil-cloths are hard to fold (and you do need to fold the bib to carry it with you when your child eats outside), and once folded then it wrinkles permanently. Also food that collects in the pocket of oil-cloth bib if not washed thoroughly right away it may go mouldy. The fabric I used, as it states above is for raincoats. It folds easily and food can be wiped away with a wet paper cloth if you eat outside and once home you can simply hand-wash it (it also endures machine wash). 

Measurements of the bib

The pattern of the bib can be found in JPG at the bottom of this post. I used my friend's bib as a model, but I  made a little improvement to the original. I made the pocket (the crumb guard) wider than the bib base, so it stays open all the time and easily collects food.  

Moms will definitely appreciate this, I am very very sure... :)))) 

Measurement of the pocket (crumb guard) of the bib

And with the left overs from the fabric, I made a bib for my daughter's favorite stuff toy. :))))) 


Bib for the bunny

Good luck! I am sure your child, niece, nephew, cousin, friend's child etc... will love the result :) 


P.S. Please find here the pattern of the bib, and excuse my handwriting and drawing. ;) 


The bib pattern 


Sunday, January 27, 2013

Recycle your old Christmas cards

Collection of six years Christmas cards
It is the end of January and high time already to take away from the shelves all the Christmas cards from last year. 

But what to do it them? 

Hmm....if you are a sentimental pack-rat, like myself :) you can collect those cards, put them in a box and occasionally have a look at them remembering the years back.... 

... or you can throw them away ( I am not even going to comment on the horror that option brings me-  :)))))

... or you can give new life to those cards, which is a nice compromise and a fun project to do. 


So in this post I will offer you three ideas how to give new life to your last year's Christmas cards. 

Or I will show you how to make: 

Reuse your old Christmas cards

1. Paper ball

2. Paper heart 

3. Paper Wreath

These are very easy to complete projects. It took me around half an hour for each one of them with the cutting of the cards, which I am  not a very big fan of. 


Cutting the cards into pieces

As I mentioned before, these are very easy projects and the hardest thing to do for me actually, was selecting the cards I needed to destroy. As I could not make that choice, so I simply used cards I've bought few years back, before I discovered my passion for paper-crafting, but have never sent them to anyone. 

So, simply pick up few cards and cut them into straight lines along the length. I used my paper cutter for that purpose- easier, faster, less headache and always straight lines.  If you don't have one, no worries, a ruler and a pencil will supply you with directions for the necessary result and if you have steady hands, which I don't (so I have a paper cutter :) ), then you are all set. Once cut, then choose theme and color compatible pieces to achieve a nicer effect. 

Generally one card is enough for making the ball and the heart, but the wreath took almost two large ones.
And here they are, the instruction by a project: 


Project number one: Paper Ball 


Paper ball as a Christmas tree decoration

Needed materials: 

12 - 13 pieces of an old Christmas card cut into 10 cm x 1 cm 
Fast drying glue
a ribbon for a hanger
optionally - additional decoration (I used a button)

I will suggest you to use fast drying glue, because you really do not want to hold the peaces together for more than a minute or two. The additional decoration is optional, I just thought that this button looks nice there. I tried to document all the instructions with step by step pictures, so I hope you will find it easy to follow.


Steps to make a paper ball from last year's Christmas cards


Project number two:  Paper Heart

Paper Heart


Needed materials: 

Old Christmas cards cut into: 
  two times 20 cm x 1,5 cm - for the stem
  two times 10 cm x 1,5 cm - heart fold number one (the smallest)
  two times 15 cm c 1,5 cm - heart fold number two (middle)
  two times 20 cm x 1,5 cm - heart fold number three (the biggest)
glue
ribbon 

I tried documenting the steps again, but when putting the instructions together, I notices I have failed to document all steps. 

However, if you follow the steps in the picture, it's very easy to make the hearts. I made the stem of the decoration two sided, so it will be nice to be seen from both sides, but when I was done with the hearts, I thought that it could be nice to have the hearts two sided too. On the other hand, my cards were empty, and when you use really mailed Christmas cards, there will be handwriting or post stamps left overs in the inner side, which is nice too. 

One advice, I would give is not to cut the pieces too short as cards are usually made of thicker paper or card board and small pieces are hard to bent in circular shapes. That is why 10 cm length was the smallest I could use. 
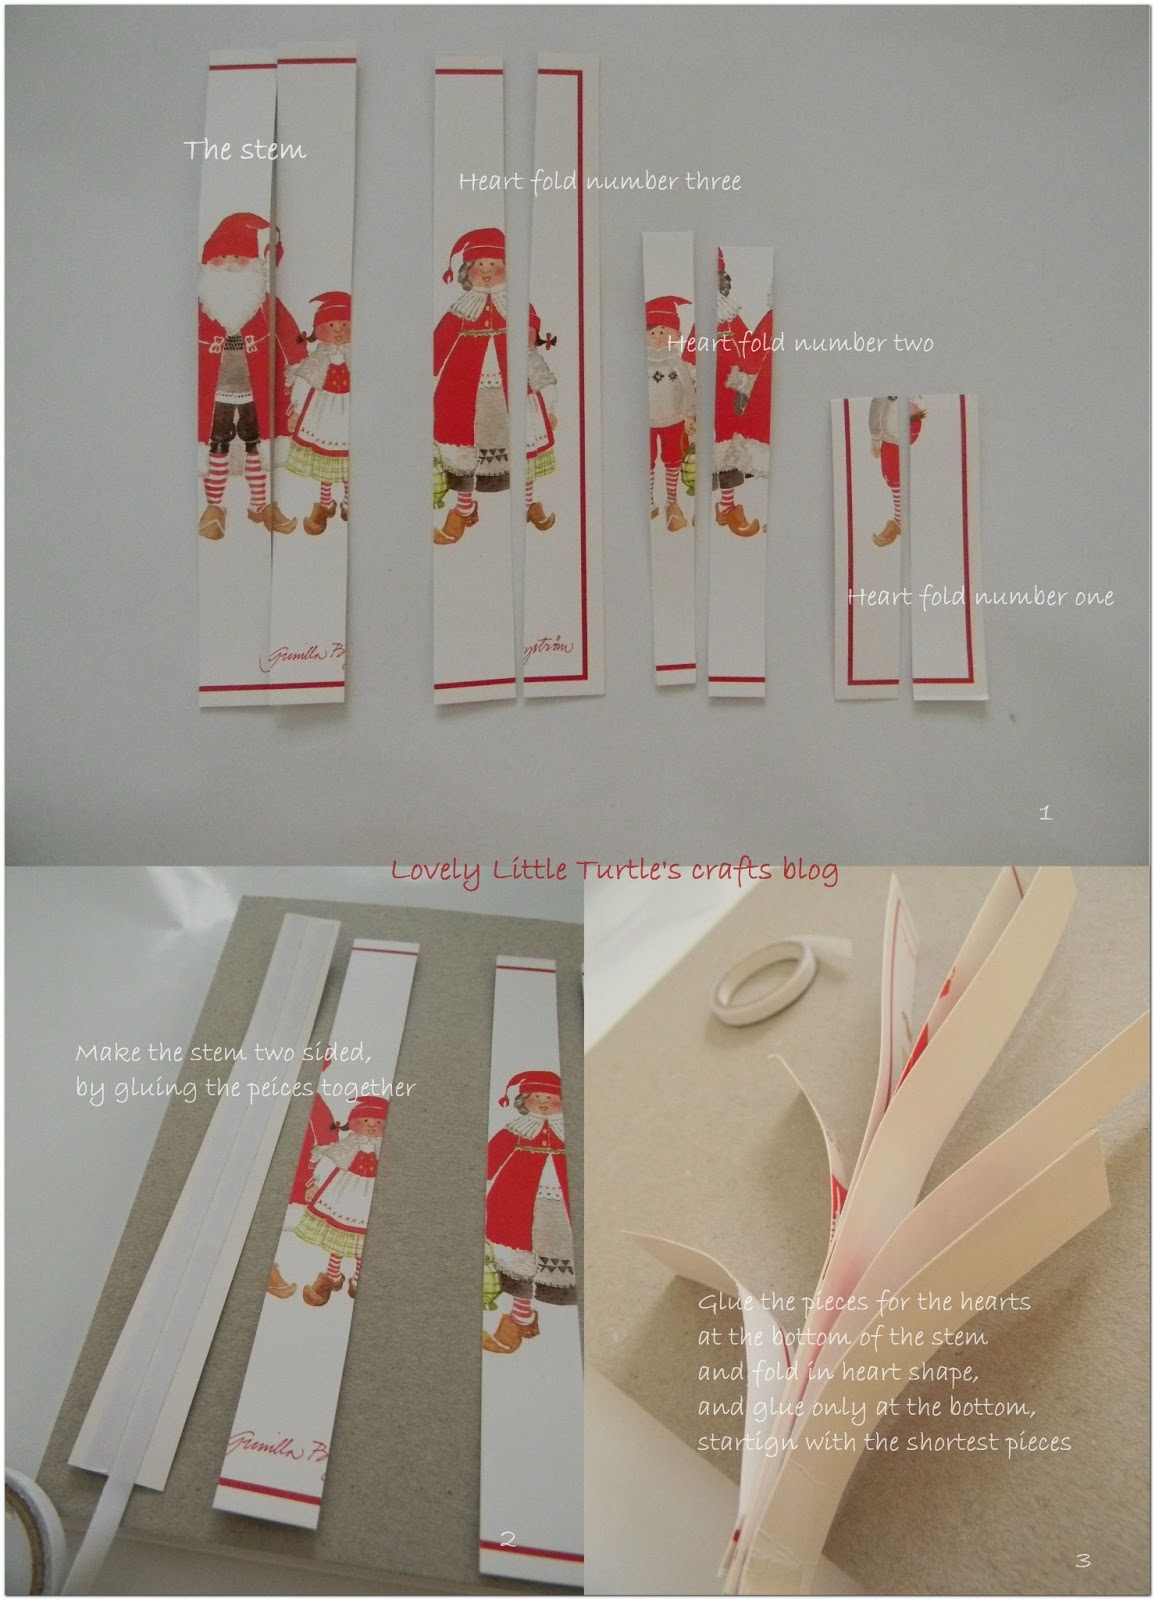
Making a paper hearts Christmas tree decoration 


And here it is....


Project number three: Paper Wreath 


Paper Wreath
Needed materials: 

Two old Christmas cards cut into: 
  18 pieces cut into 10 cm x 1 cm - level one of the wreath
  18 pieces cut into 10 cm 0,5 cm  - level two of the wreath
  12 pieces cut into 2 cm x 0,5 cm - for the center of the wreath
cardboard template cut into wreath shape - or a doughnut shape 
glue
ribbon 

Steps of making a paper wreath from old Christmas cards 

Follow the instructions in the image to achieve the desired result. The third level of the wreath (with the small pieces) is not necessary but it gives a great finishing touch. You can achieve that gluing a ribbon, or buttons or anything else theme suitable as well. 

Well, this is it this time. Rather long, but I hope inspirational for you post. And remember you can use these instructions for any other seasonal or non-seasonal projects you have. I just thought that these three items make wonderful Christmas tree decoration and this way all the nicest wishes your friend put into sending these cards to you will still be there with you every Christmas. 

Good Luck! 

New life for your old Christmas cards


Sunday, January 13, 2013

Easy decoration for a frame


In this post, I would like to show you a very easy way to decorate and personalize a frame.

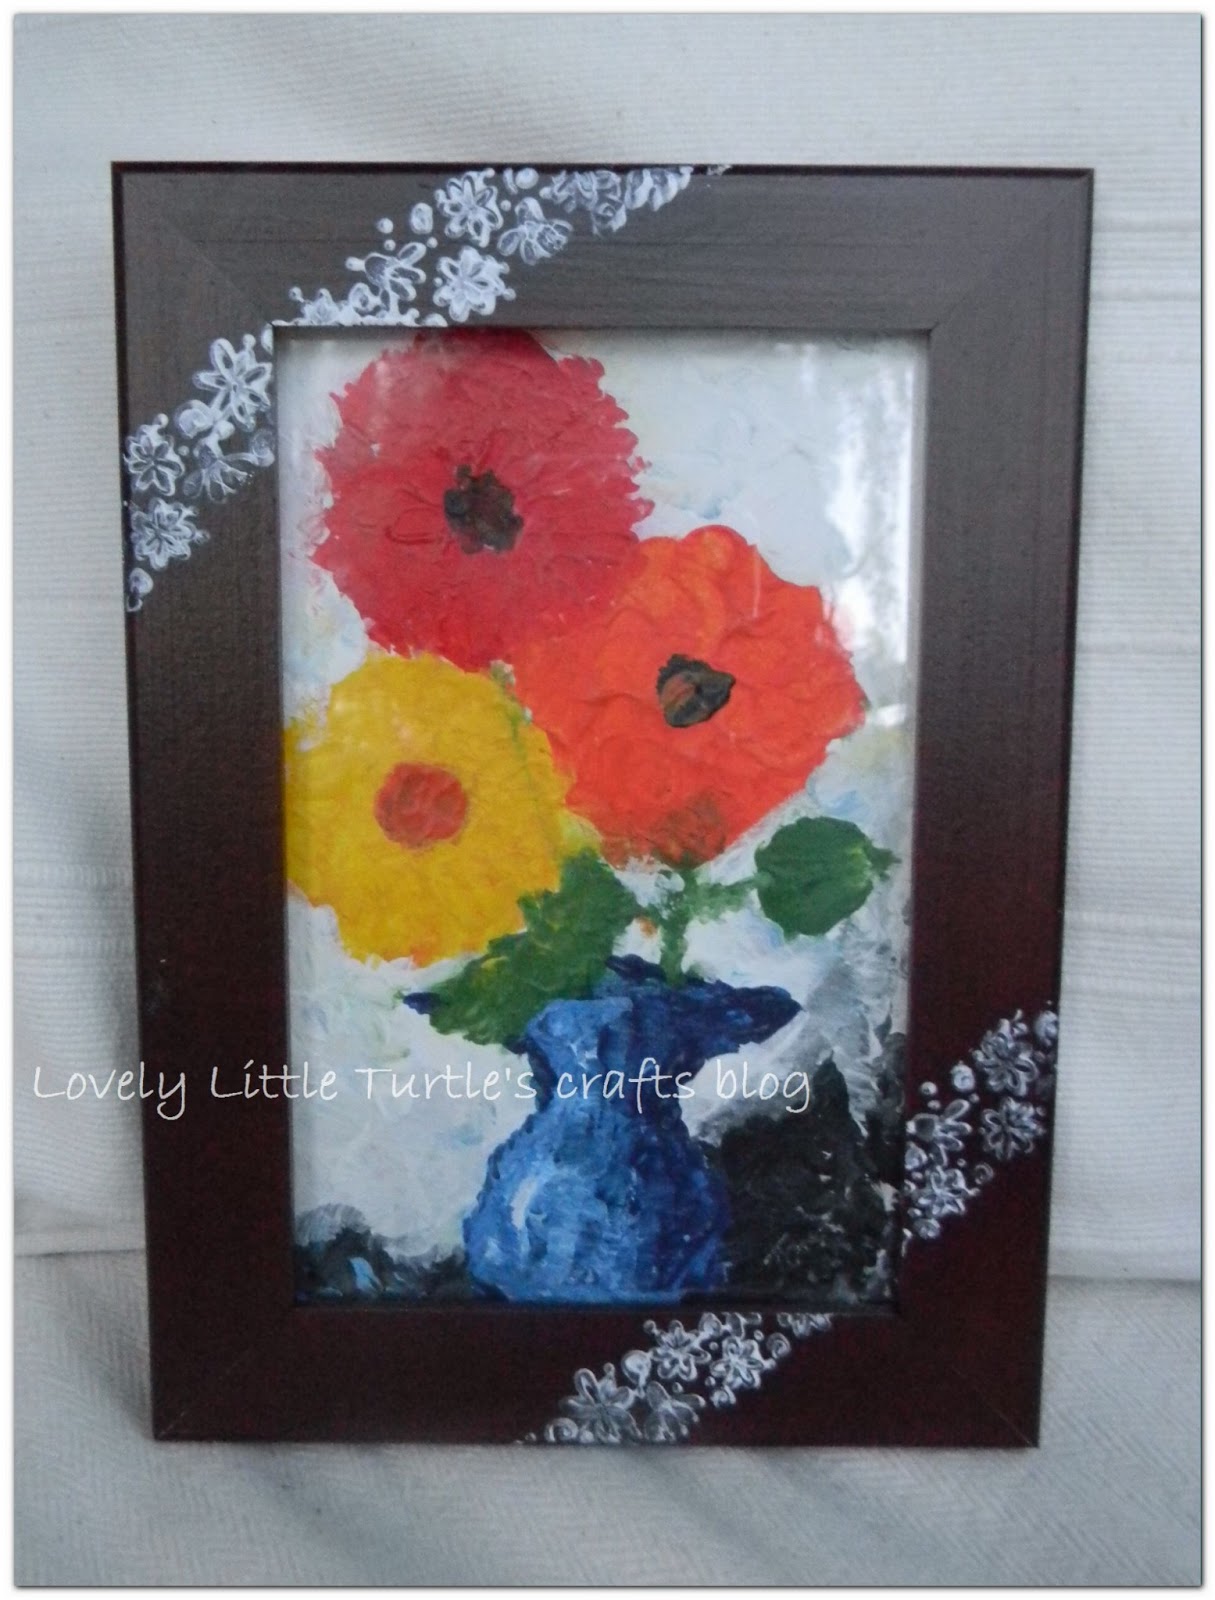
I like experimenting with new techniques and this is what came up when I decided to combine acrylic paint, a rubber stamp and a frame. This project was a part of the 'Thank you' gift for my yoga teacher, with which I started my blogging experience. If you are curious to read, simply scroll down and you will see it - post Number One

I wanted to have similar elements at the picture frame and the card, that is why I used the same rubber stamp and white acrylic paint.
Similar patterns
Although, the rubber stamp contained detailed instructions with what brand of ink I SHOULD be using it, I did not follow the instructions. I am not a big fan of branding instructions and with experience in marketing, I really really know what's the catch all about. So, I tried my own technique. And it did work! 

But, please do not accept that as an anti-branding propaganda, I just think that sometimes it's nice to try something else or new, though I need to admit, I have ruined projects by not following the instructions. Ops! (an ashamed face emoticon would be an appropriate one right now :) ). 

Well, well, anyway - this project succeeded nicely and was very easy to make. And it is wonderful! It just brings such a nice personal detail to a frame. 

So, needed materials:

Needed materials for decorating a frame

an wooden frame
rubber stamp
white acrylic paint
a brush to lay the paint on

Why acrylic paint?

Well, due to its properties, acrylic paint dries fast and you can achieve a nice relief of the service. Usually acrylic paint does not washes away easily with water, so it is perfect for purposes like this one.

Applying paint on the rubber stamp

Apply the paint over the rubber stamp, making sure that there is not excessive amount of paint on the stamp. Too much paint will smudge the image, too little will make it look pale. I would recommend you to try stamping few times on a separate piece of paper beforehand, so you can get a grip of the amount of paint you need to use.    

Applying pressure


Once you have mastered the technique, just bravely stamp over the frame. Apply pressure and wait for 15-20 secs before you separate the stamp from the frame. Leave the paint to dry as much as it needs - that usually depends on the amount of paint you have applied. If you are in a hurry, you can help the drying process with a hairdryer, but do not use it for cards. And I would really recommend to leave a day until you can use the frame for the necessary purpose. 

And this is it! You are ready! 


The frame ready for adding a painting


Add your picture, painting, photo, fabric, whatever you like.... For my yoga teacher, I also painted this picture of flowers. I used to like painting when I was a child, and decided to reconnect with that hobby of mine. 


Easy and lovely hand decorated picture frame
It's easy and the result is wonderful! 

P.S. I made the explanatory images with another wooden frame, as you probably see, but today when I wanted to up-date the blog, I realized that I haven't taken these pictures, when I decorating the frame. And the frame is already with my yoga teacher. 

Saturday, January 5, 2013

No sugar and no flour 100 % oatmeal home-made cookies

Strange title for a post in a crafts blog, isn't it? Well, you are correct :), but as you have noticed I left a tab for the so called 'Kitchen crafts', in which I could also include my kitchen crafts ideas as for example the curtains in our kitchen, which I made myself,  but this post will include some recipes, which I love making and happily share with everyone. 

Although, this is not culinary blog, along with crafting I do enjoy cooking as well and most of all I love baking. 

100 % oatmeal no sugar cookies
I bake cookies, cakes, muffins, strudels, biscuits (both in the American and British meaning of the word), focaccia, scones, breads, pies, quiches, tarts, tartalets, eclairs, etc.... ,everything that has to do with dough, and you need to begin from scratch. And I love it! A baking challenge? I am in, and although it may take few attempts till it looks and tastes right, I don't give up.

It could be a hereditary skill. My favorite grandmother is a great baker. I still keep in my memories the smell of freshly baked bread served for dinner or the view of the ready home-made filo dough, which we were not allowed to touch, so we would't damage the tender surface.

So, occasionally I will add here some of my favorite baking recipes and I hope they will inspire you too.


Choice number one has been rather humble as the title suggest. I am giving you my favorite recipe for no sugar no flour 100 % oatmeal home-made cookies.


But how did I come up with that recipe? A friend of mine visited me when I was in my ninth month pregnancy and brought freshly baked wonderful banana bread. I can't describe the smell and the taste of that bread :) but I can describe my disappointment as I could't have any of it - with the nine month big belly, I really had to avoid flour and sugar. So then I decided to make my own version of the banana bread. The result was this recipe.

No sugar and no flour 100 % oatmeal home-made cookies 


(makes around 14 pieces, 55 ccal/per one)

Ingredients:
No sugar no flour cookies

The ingredients are literary what you see on the image above :).

2 eggs
150 gr. oatmeal
5 tb.s. plain yogurt
1 banana (or 1/2 banana + 1/2 red delicious apple)
30 gr. raisins

Optionally:
20gr. linen seed

Mix the eggs together. Cut the banana (apple) into big chunks. Add all the ingredients together while mixing with a fork. Wait for a bit till the oatmeal soaks the yogurt and eggs. The consistency of the mixture can be seen in the picture under.

Consistency of the dough

Once ready, spoon the mixture onto baking paper and shape into cookies as much you can achieve such form :). Try to add at least one visible banana piece and couple of raisins per cookie.

Optionally, decorate with sesame seed.

Bake in pre-heated oven on 175 C, for about 15-20 minutes. Do not wait for the cookies to turn into golden brown, then it's too late and they become too dry.

Serving suggestions: as they are or with coffee, tea, or I like having them with my dried plums no sugar jam (dried plums softened for for 5 minutes in boiling water and when chilled mixed-in with a hand blender), but I strongly recommend you to try them as they are first. You will be surprised how sweet they are without any sugar added.

No sugar no flour 100 % oatmeal cookies


These cookies are simply your oatmeal porridge morning breakfast, but just in a different shape :). Rich on fiber, and with natural sweetness from the fruits they are perfect for your morning coffee break or afternoon tea time. If you wish to lower the calories, you can substitute the banana with an apple, the raisins with dried plums cut into pieces and use low fat yogurt. 

Bon Appétit!