 |
| Collection of six years Christmas cards |
It is the end of January and high time already to take away from the shelves all the Christmas cards from last year.
But what to do it them?
Hmm....if you are a sentimental pack-rat, like myself :) you can collect those cards, put them in a box and occasionally have a look at them remembering the years back....
... or you can throw them away ( I am not even going to comment on the horror that option brings me- :)))))
... or you can give new life to those cards, which is a nice compromise and a fun project to do.
So in this post I will offer you three ideas how to give new life to your last year's Christmas cards.
Or I will show you how to make:
 |
| Reuse your old Christmas cards |
1. Paper ball
2. Paper heart
3. Paper Wreath
These are very easy to complete projects. It took me around half an hour for each one of them with the cutting of the cards, which I am not a very big fan of.
 |
| Cutting the cards into pieces |
As I mentioned before, these are very easy projects and the hardest thing to do for me actually, was selecting the cards I needed to destroy. As I could not make that choice, so I simply used cards I've bought few years back, before I discovered my passion for paper-crafting, but have never sent them to anyone.
So, simply pick up few cards and cut them into straight lines along the length. I used my paper cutter for that purpose- easier, faster, less headache and always straight lines. If you don't have one, no worries, a ruler and a pencil will supply you with directions for the necessary result and if you have steady hands, which I don't (so I have a paper cutter :) ), then you are all set. Once cut, then choose theme and color compatible pieces to achieve a nicer effect.
Generally one card is enough for making the ball and the heart, but the wreath took almost two large ones.
And here they are, the instruction by a project:
Project number one: Paper Ball
 |
| Paper ball as a Christmas tree decoration |
Needed materials:
12 - 13 pieces of an old Christmas card cut into 10 cm x 1 cm
Fast drying glue
a ribbon for a hanger
optionally - additional decoration (I used a button)
I will suggest you to use fast drying glue, because you really do not want to hold the peaces together for more than a minute or two. The additional decoration is optional, I just thought that this button looks nice there. I tried to document all the instructions with step by step pictures, so I hope you will find it easy to follow.
 |
| Steps to make a paper ball from last year's Christmas cards |
Project number two: Paper Heart
 |
| Paper Heart |
Needed materials:
Old Christmas cards cut into:
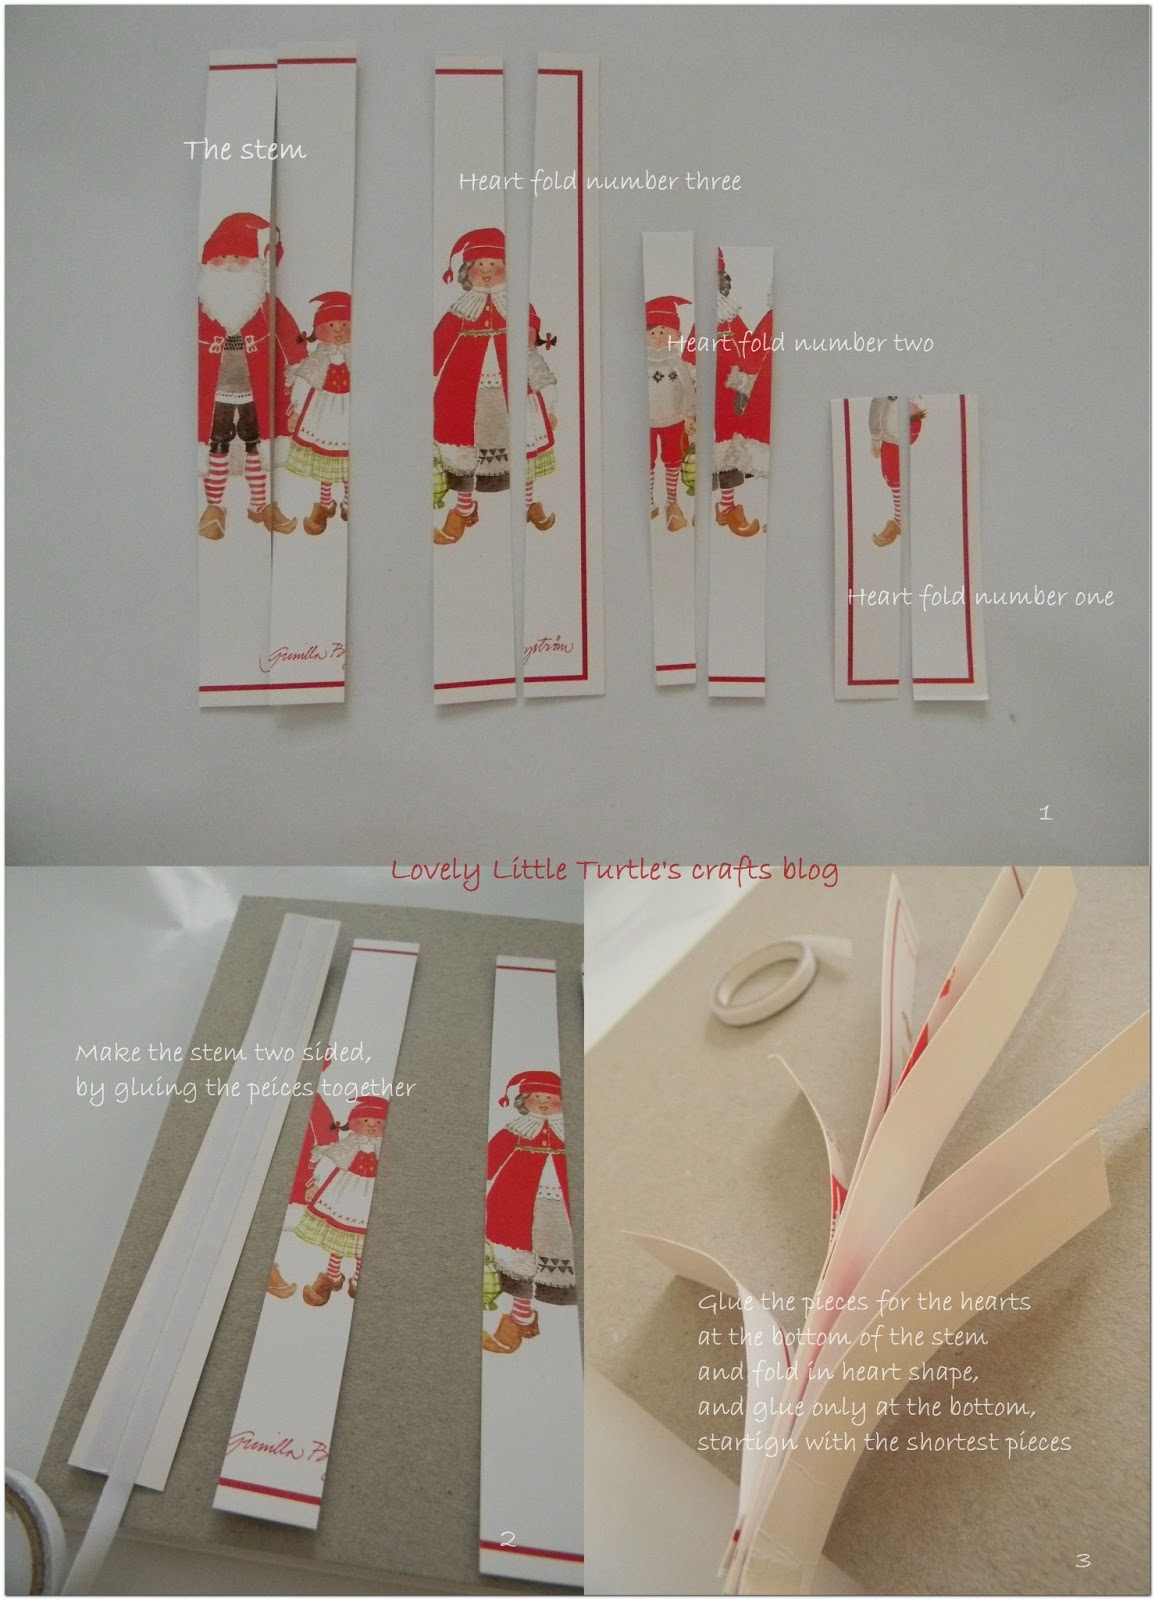
two times 20 cm x 1,5 cm - for the stem
two times 10 cm x 1,5 cm - heart fold number one (the smallest)
two times 15 cm c 1,5 cm - heart fold number two (middle)
two times 20 cm x 1,5 cm - heart fold number three (the biggest)
glue
ribbon
I tried documenting the steps again, but when putting the instructions together, I notices I have failed to document all steps.
However, if you follow the steps in the picture, it's very easy to make the hearts. I made the stem of the decoration two sided, so it will be nice to be seen from both sides, but when I was done with the hearts, I thought that it could be nice to have the hearts two sided too. On the other hand, my cards were empty, and when you use really mailed Christmas cards, there will be handwriting or post stamps left overs in the inner side, which is nice too.
One advice, I would give is not to cut the pieces too short as cards are usually made of thicker paper or card board and small pieces are hard to bent in circular shapes. That is why 10 cm length was the smallest I could use.
And here it is....
Project number three: Paper Wreath
 |
| Paper Wreath |
Needed materials:
Two old Christmas cards cut into:
18 pieces cut into 10 cm x 1 cm - level one of the wreath
18 pieces cut into 10 cm 0,5 cm - level two of the wreath
12 pieces cut into 2 cm x 0,5 cm - for the center of the wreath
cardboard template cut into wreath shape - or a doughnut shape
glue
ribbon
 |
| Steps of making a paper wreath from old Christmas cards |
Follow the instructions in the image to achieve the desired result. The third level of the wreath (with the small pieces) is not necessary but it gives a great finishing touch. You can achieve that gluing a ribbon, or buttons or anything else theme suitable as well.
Well, this is it this time. Rather long, but I hope inspirational for you post. And remember you can use these instructions for any other seasonal or non-seasonal projects you have. I just thought that these three items make wonderful Christmas tree decoration and this way all the nicest wishes your friend put into sending these cards to you will still be there with you every Christmas.
Good Luck!
 |
| New life for your old Christmas cards |


No comments:
Post a Comment